It’s no secret that when it comes to things like managing a server or a Kubernetes cluster most of us prefer to use our beloved terminal rather than a GUI tool. For many people, it’s like driving a car with a manual gearbox: simple, comfortable, flexible, and more predictable. Kui is a hybrid interface tool aimed at enhancing the classic terminal experience.
Dubbed by the author a “CLI with a GUI twist,” the program is marketed as a GUI-enhanced CLI interface for managing Kubernetes clusters. The project is progressing quite rapidly even though the development is being performed by just one person (Nick Mitchell). Currently, it has over 2,100 stars on GitHub. The Kui repository has been recently moved from the IBM repo to the kubernetes-sigs global repo (the so-called Special Interest Groups, SIGs) of the K8s community.
Installing and exploring the interface
Kui is a cross-platform application with builds available for macOS, Linux, and Windows. You can also build it from the source. It has the Electron framework under the hood and is shipped as a single pre-built binary. Read here to learn more about installing Kui.
At first glance, Kui is like most terminals. There is an option to switch between tabs on top as well as a button to split the current tab into vertical and horizontal subwindows. There is a drop-down menu in the lower right corner for selecting a feel-and-look theme, help button, and notification area.
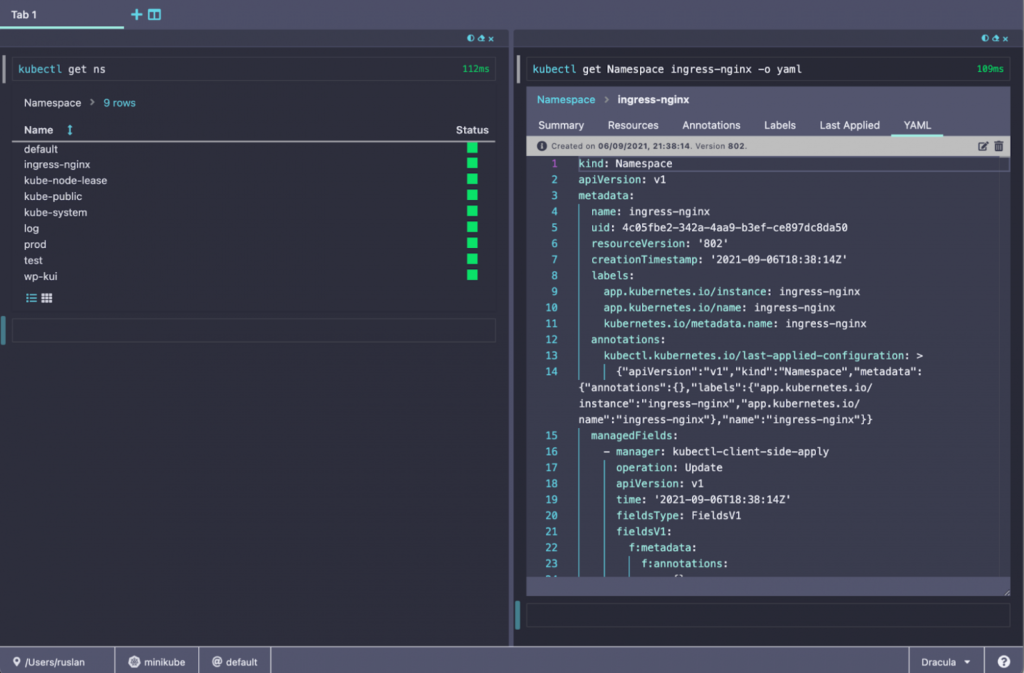
What makes the Kui interface special is that each entered command is not a typical terminal line but rather a panel with a field for entering the command:
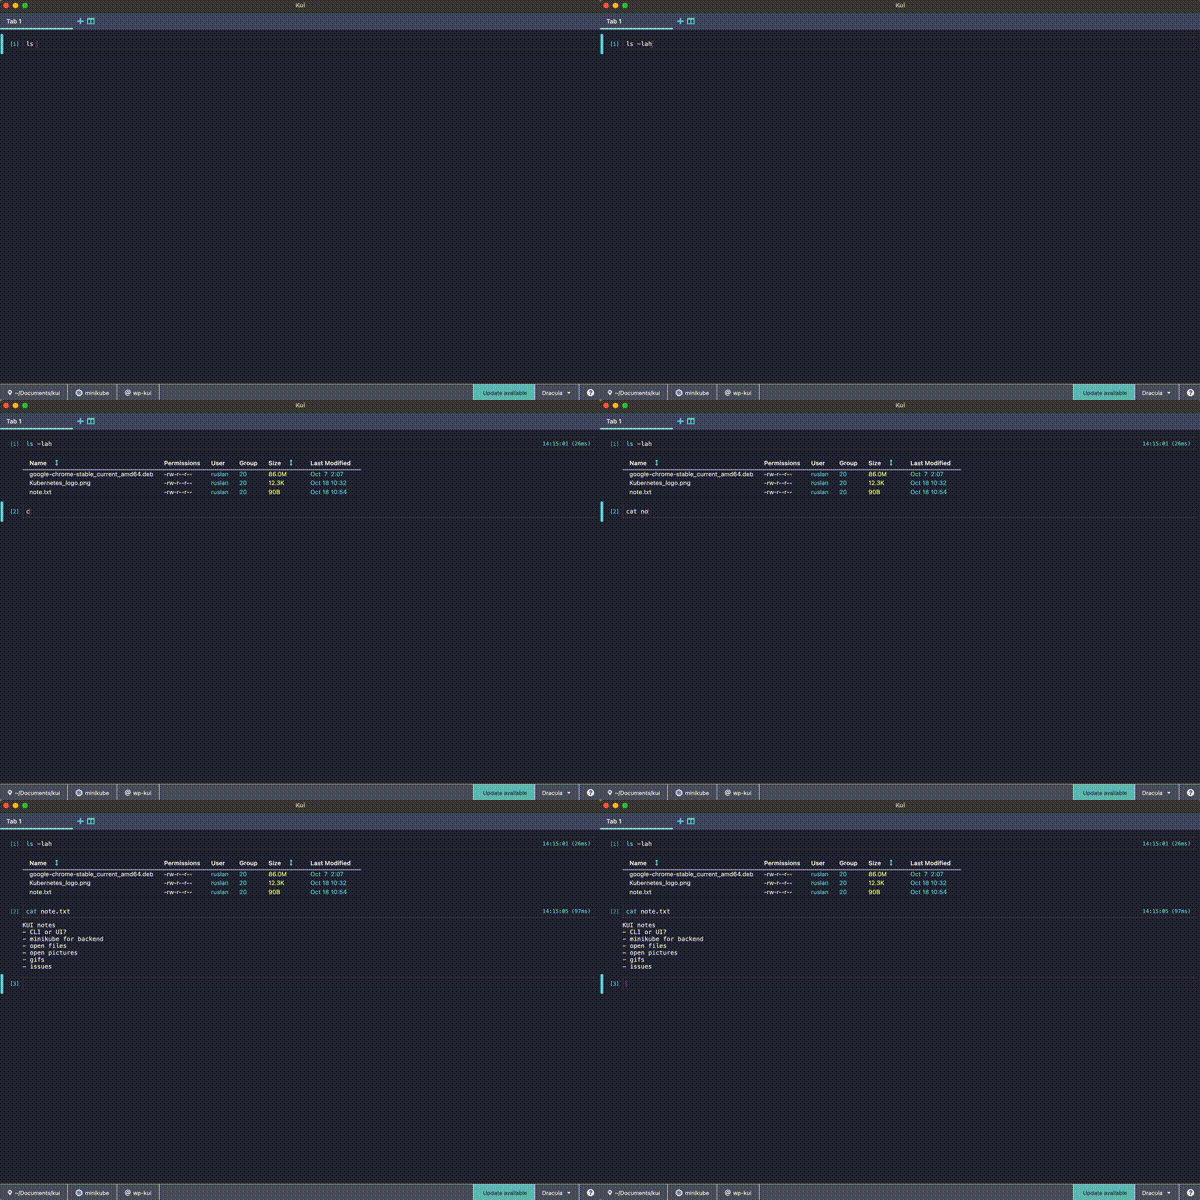
When you hover your mouse over the panel, a menu appears that allows you to copy command, the result that it produces, or a link to it (we’ll discuss that feature later).
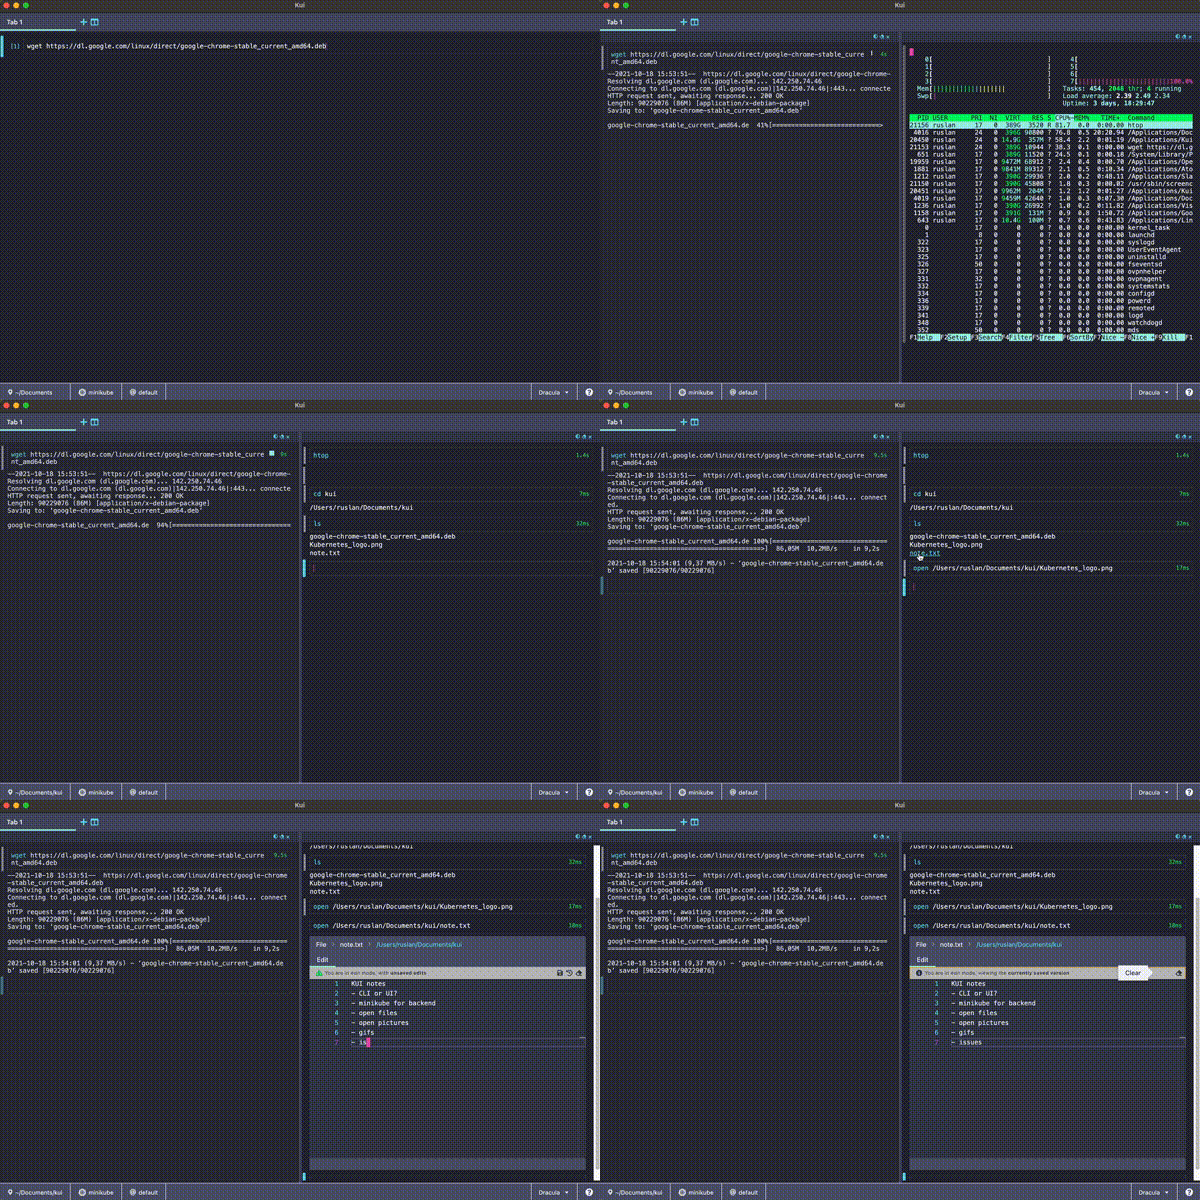
Kui can handle different file formats in the terminal. For example, images can open up in the default viewer. You can also open and edit text files using the built-in editor. This editor provides the minimum set of features you need to manipulate text files. For example, there is line numbering, and you can simply click on the desired text block to position the cursor. In the upper right corner, there is a typical set of buttons to save changes, cancel your last action, and clear the contents of the document.
The tab can be split into vertical and horizontal subwindows (depending on how many of them there are). However, you cannot change the subwindows’ size and layout by default. Their size changes in proportion to the size of the main window. In the upper right corner of each subwindow are buttons to invert the background, clear the contents, and close the subwindow.
Kui and Kubernetes
Now let’s talk about using this “terminal” with Kubernetes. You can run Kui either as a standalone application or as a kubectl kui plugin (for example, by typing kubectl kui get namespace in the terminal). Access to the Kubernetes cluster is organized using the kubeconfig file. Furthermore, context switching is available in the application itself.
We will need a K8s cluster to familiarize ourselves with Kui. To do so, I will use minikube with the WordPress app deployed via a Helm chart. You can also connect several Kubernetes clusters to Kui at the same time. In this case, the bottom menu allows you to switch between them. The current directory and the Kubernetes context are shown in the lower-left corner of the window (and you can easily switch between namespaces).
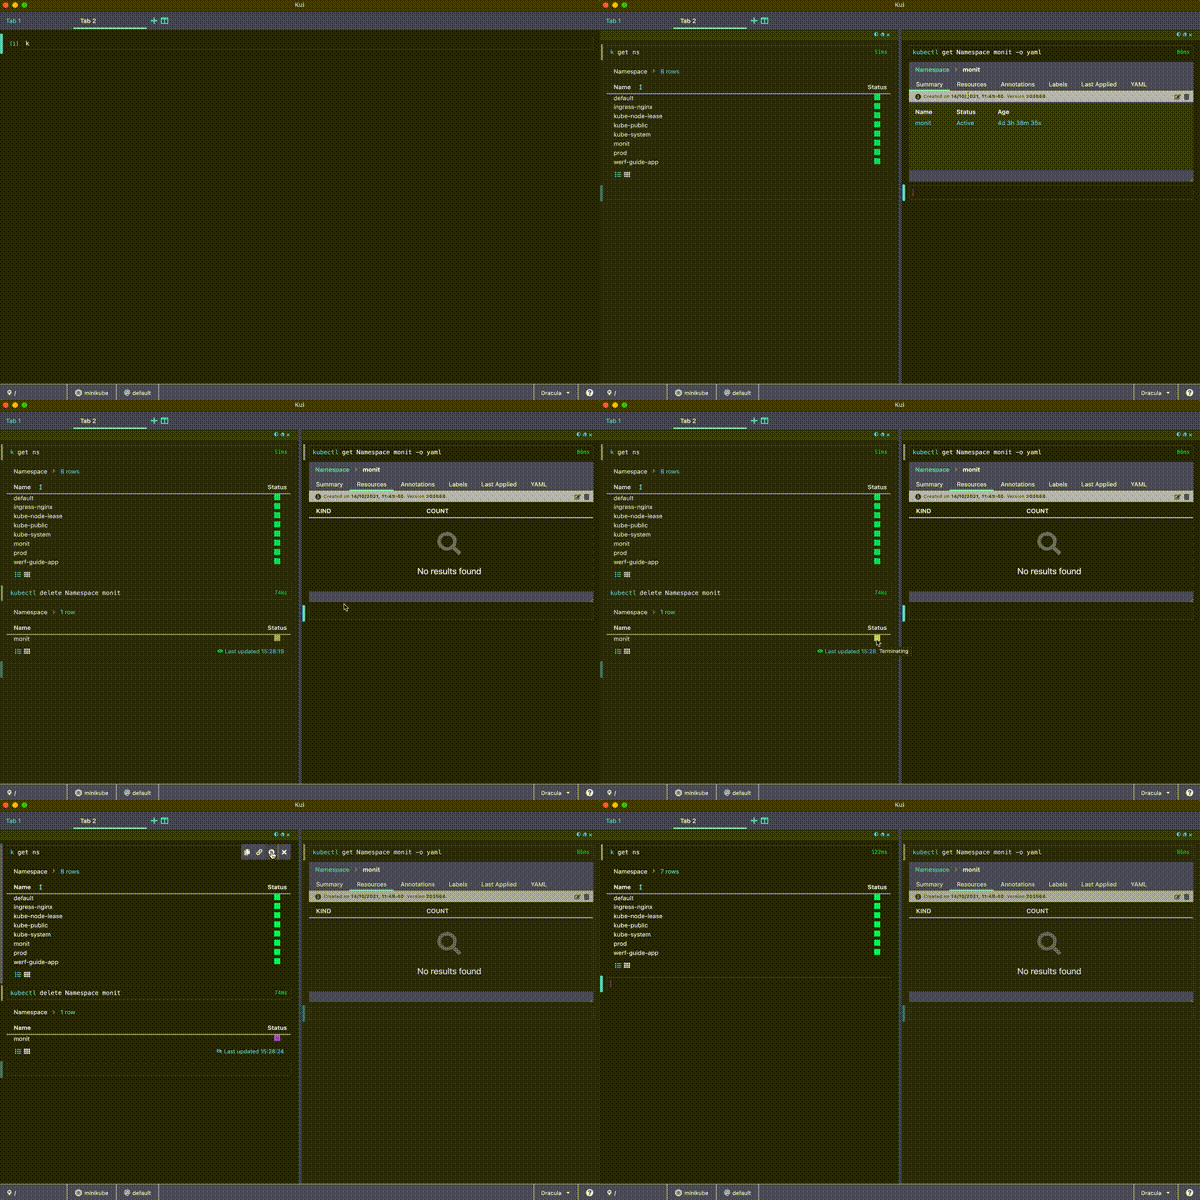
The most remarkable feature of the KUI when working with Kubernetes is that the application displays key Kubernetes resources as tables and tabs. For example, you can list namespaces in a particular cluster using the kubectl get namespaces command (a shorter k alias is also available) and then work with the cluster resources via the GUI. Next to each namespace is a colored square that displays its status: if you delete a namespace, the color of its square turns from green to blue.
The Kui interface is based on a drill-down approach; that is, it starts with a global view and then narrows the focus down to progressively smaller elements:
- When the target namespace is selected (say,
wp-kui), a tab opens up automatically in the same window. This tab has a panel with thekubectl get namespace wp-kui -o yamlcommand. - There is a menu with tabs below this panel:
- Summary — the name of the namespace, its status, and running time;
- Resources — the main namespace resources: Pod, Service, Deployment, ReplicaSet, StatefulSet, and how many of them there are. This is essentially the same output as the one you get with
kubectl -n namespace get all; - Annotations (not in all namespaсes);
- Labels;
- Last Applied (this tab is absent in system namespaces);
- YAML — the manifest for the namespace. This manifest can be edited.
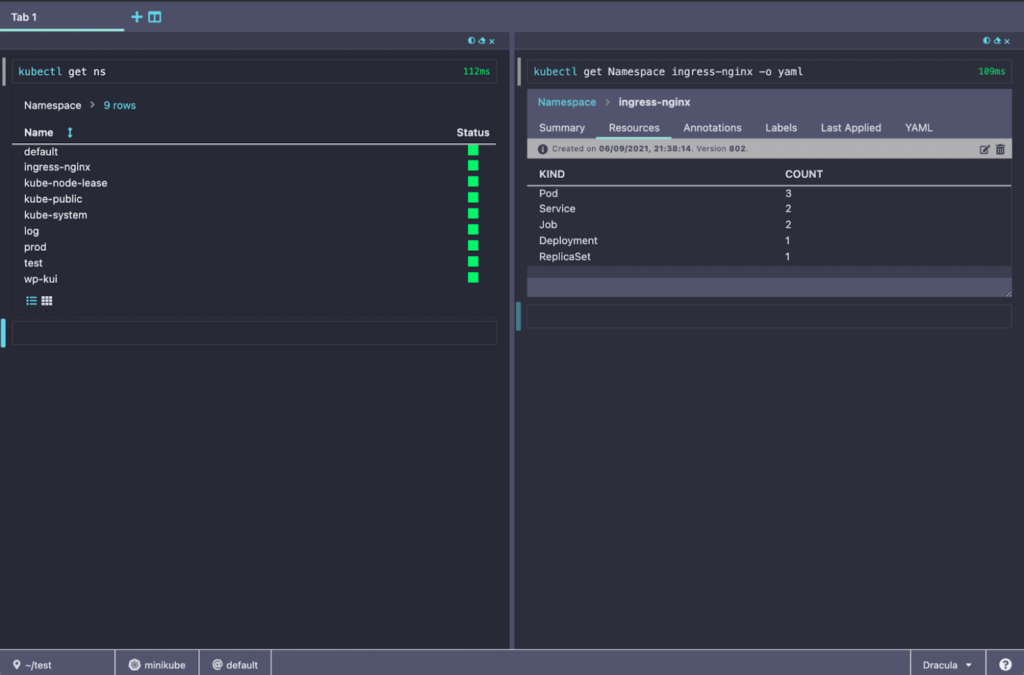
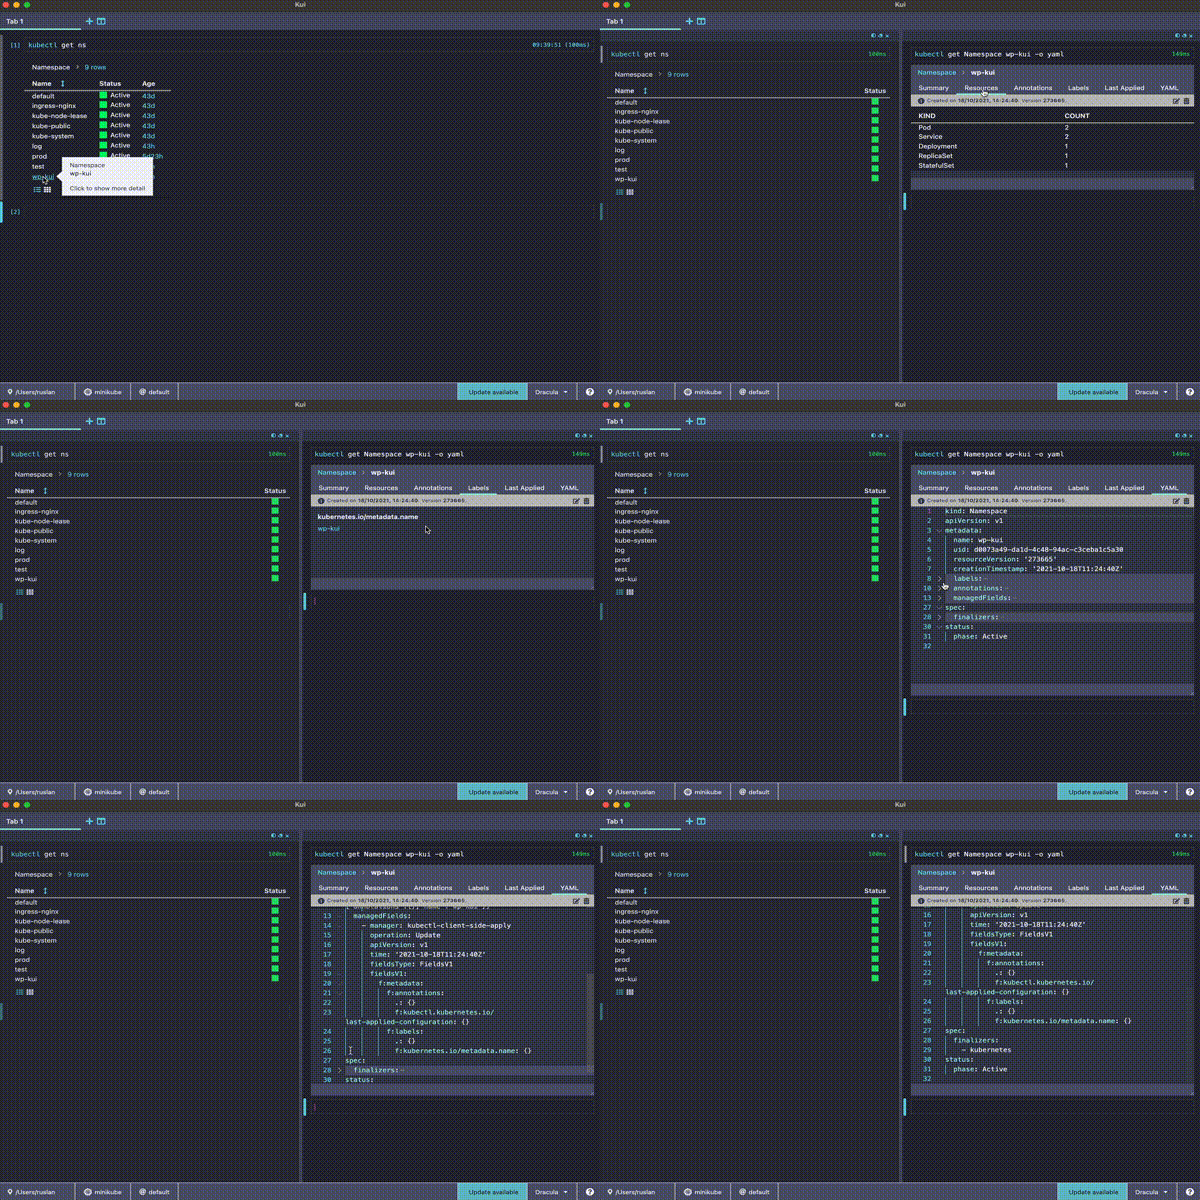
The general process of using tabs and working with their contents goes more or less as follows:
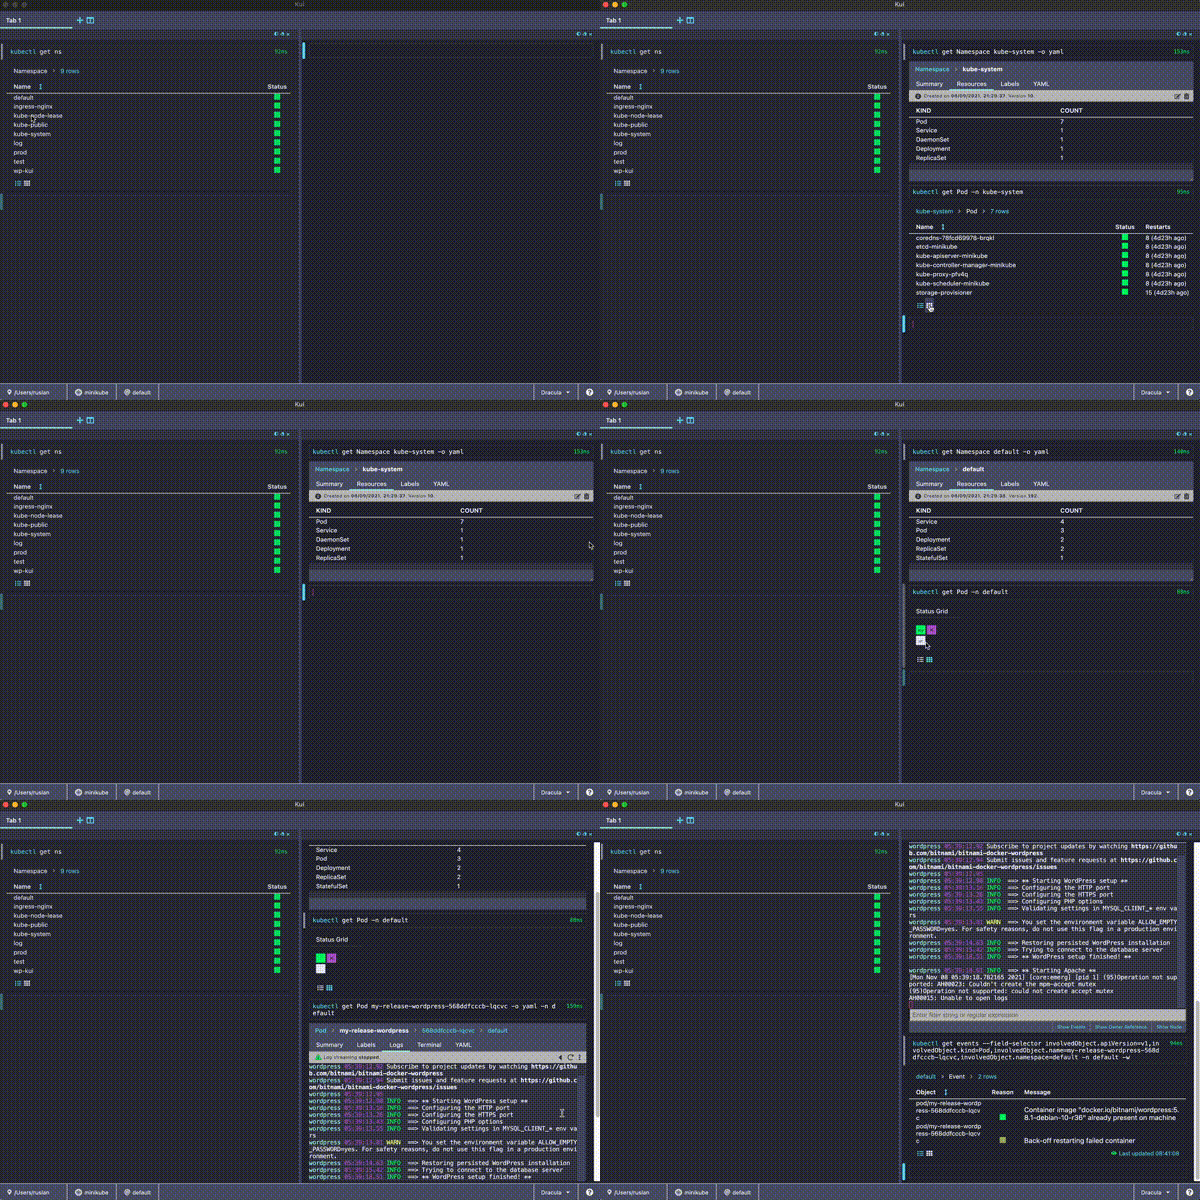
A similar drill-down approach works for other Kubernetes entities. For example, you can go to the Resources tab and select the resource of interest (say, a Pod). In this case, a panel with the kubectl get pod -n namespace command will be displayed in the subwindow as well as a set of Pods in that namespace. The menu consists of the Pod names and their statuses in textual and graphical form (a grid of differently colored squares followed by the Pod statuses).
The graphical representation of Pod statuses comes in handy for displaying stats about namespaces with a large number of Pods or resources in a compact fashion. For example, you can easily see that there is a Pod with the status CrashLoopBackOff. If you click on it:
- a panel will appear with the
kubectl get pod nameOfPod -o yaml -n namespacecommand along with a menu window including the following tabs:- Summary — key parameters such as status, number of running Pods/Pods in the replica, status, restarts, age, IP, node, among others;
- Labels;
- Logs — the logs of the Pod’s main container (the most useful information for diagnosing a problem);
- Terminal — the option to exec into the container CLI;
- YAML tab with the manifest;
- also, there are buttons on the bottom menu:
- Show Events — shows events related to the resource;
- Show Owner Reference — in the case of a Pod, this is its owning ReplicaSet; in the case of a ReplicaSet, this is a Deployment entity;
- Show Node — information about the host where the Pod is currently running.
The interface is designed so that information about K8s entities is displayed in a new menu subwindow (below the preceding window). You can close the windows/panels you no longer need using the pop-up submenu of the command panel.
Notebooks
Another cool Kui feature is saving all your actions in a notebook. Opening such a notebook will open a tab with all the command panels you executed before saving it. The output menu windows of these commands can be maximized. At the same time, Kui does not keep track of tabs in the command output windows.
Notebooks can be used, for example, to create tutorials. The Kui distribution has several of these Kubernetes tutorials available immediately after installation. For example, the Kui help is presented in a notebook format.
Such guides are interactive since you can run commands right from the notebook. In addition, you can split the window into several horizontal and vertical sub-windows with custom background colors. Note that Kui treats lines in the command panel beginning with # as comments. You can also insert kui-link links copied using the link button on the left side of the command input panel. Kui supports loading comments from a Markdown file using the commentary -f /path/to/file command to make it easier to write text notes.
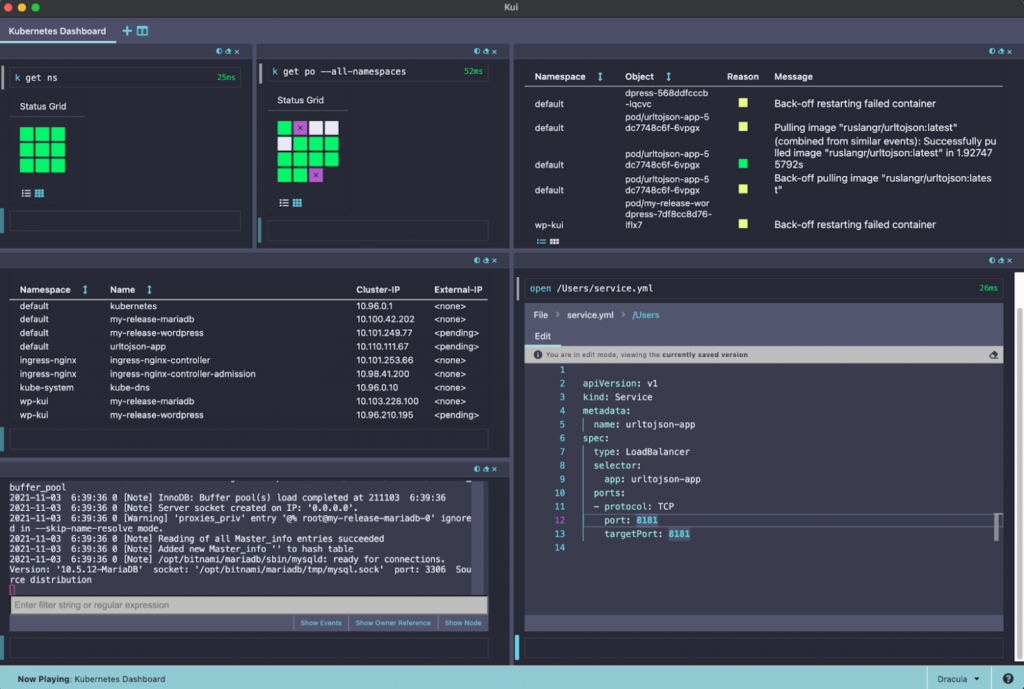
In addition, Kui notebooks can be used to create dashboards for monitoring or managing a cluster. A sample dashboard is included in the Kui distribution. You can use it as the basis for creating a customized dashboard tailored to your cluster:
Customizing Kui
By default, Kui supports changing themes and adjusting font size. Fortunately, you can create a custom Kui build. In it, you can customize both visual (font size, icons, themes) and functional elements (using plugins). There is a wiki on GitHub covering Kui customization.
While Kui is actively evolving towards Kubernetes integration, it is not the only use case for the tool. It has a full-fledged CLI-based platform under the hood. Executing some commands may result in graphical output. For example, the kubectl get ns command displays namespaces as a graphical table with multicolored squares where each color represents a specific state.
This article only discusses the kubectl plugin that is installed by default. However, Kui has several other ready-to-use plugins: s3, iter8, and git.
Final impressions
Over the process of writing this article, I tested Kui on a production cluster with multiple environments and resources. The kubectl get ns command in a cluster with ~80 namespaces runs slightly slower than its terminal counterpart but within comfortable limits. The main downside is the limited number of default settings.
In my opinion, Kui is a great place to take a first dive into the Kubernetes world from. A well-structured interface with logically arranged menu tabs makes it easy to understand the cluster resources hierarchy. UI actions that duplicate console commands accelerate the learning of the Kubernetes command syntax. Some useful additions such as displaying the status of resources as colored squares (whereby the square color depends on the specific status) are also worth mentioning. This approach makes it easier to assess the state of the cluster and speeds up the troubleshooting diagnoses.
The ability to create notebooks and dashboards looks particularly appealing: there is evident, enormous potential for using them for different purposes.
Kui is certainly not the first CLI utility to make Kubernetes easier to use (k9s comes to mind, for example). However, what sets Kui apart from other similar tools is that it isn’t limited to the classic terminal features. This tool fills the console interface with useful graphical elements, enhancing the typical terminal experience. At the same time, it sticks to its console roots without turning into a GUI application like Lens. Whether that’s an upside or a downside is up to you to decide.
Conclusion
Of course, the terminal we all love has changed a lot since the first teletypes. However, its basic operating principles remain the same. Kui enriches the good old terminal experience with GUI features, giving you a different perspective of it. Well, so far Kui succeeds at it.
As I was writing this article, I was notified several times of available updates. The active development of the project adds to the belief that its weaknesses will be eliminated while the concepts behind the hybrid interface will continue to be improved upon.



Comments