

This May, a major release of Rook 1.0.0, “production ready, cloud-native storage for Kubernetes”, has been announced. While we have had our first look at this solution about a year ago, it’s been a while since we’ve got a real experience using it. Finally, we are happy to share our lessons learned.
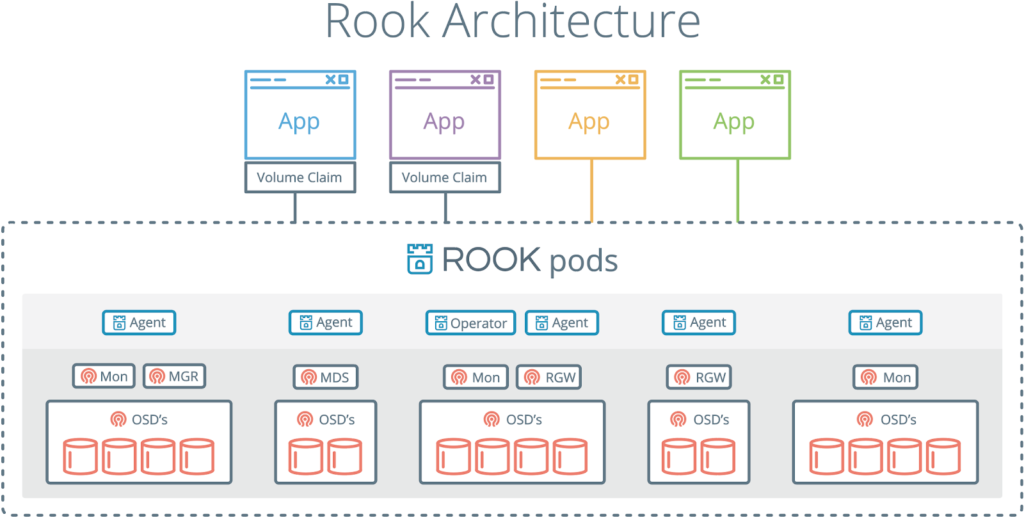
In short, Rook is a set of Kubernetes operators that fully controls deployment, management, and automatic recovery of various data storage solutions such as Ceph, EdgeFS, Minio, Cassandra, CockroachDB.
At the moment, rook-ceph-operator is the most developed (and the only stable) solution.
Note: Prominent features of the Rook 1.0.0 release related to Ceph include a Сeph Nautilus support and CephNFS CRD starting NFS daemon for exporting CephFS volumes or RGW buckets. Additionally, the new version boasts long-awaited beta-level support for EdgeFS.
In this article, we are going to:
- answer the question of what are the benefits of using Rook to deploy Ceph in the Kubernetes cluster;
- share our experience and insights on the matter of using Rook in the production environment;
- explain why we say “Yes” to Rook and share our future plans for it.
But let’s start with general concepts and theory.
“Rook is my advantage!” (Unknown chess player)
One of the main benefits of Rook is that it interacts with data storage via native Kubernetes mechanisms. That means that you no longer need to manually configure Ceph using its commands.
— Would you like to deploy CephFS in a cluster? Just create a YAML file!
— What? Do you also want to deploy an object store having S3 API? OK, simply create another YAML file!
Rook has all the features of the typical Kubernetes operator. Interactions with it rely on Custom Resource Definitions (CRD) that describe the properties of Ceph instances we need (unless explicitly stated otherwise, in the rest of the article we would imply Ceph since it is the only stable storage solution in Rook). Using the provided parameters, an operator would automatically execute commands required for setting up.
Let’s consider a specific example of creating the Object Store, or rather CephObjectStoreUser:
apiVersion: ceph.rook.io/v1
kind: CephObjectStore
metadata:
  name: {{ .Values.s3.storeName }}
  namespace: kube-rook
spec:
  metadataPool:
    failureDomain: host
    replicated:
      size: 3
  dataPool:
    failureDomain: host
    erasureCoded:
      dataChunks: 2
      codingChunks: 1
  gateway:
    type: s3
    sslCertificateRef:
    port: 80
    securePort:
    instances: 1
    allNodes: false
---
apiVersion: ceph.rook.io/v1
kind: CephObjectStoreUser
metadata:
  name: {{ .Values.s3.username }}
  namespace: kube-rook
spec:
  store: {{ .Values.s3.storeName }}
  displayName: {{ .Values.s3.username }}
Parameters provided in the listing are fairly common and should not require further explanation. However, you should pay close attention to the values designated as template variables.
The general routine is structured as follows: we request resources via a YAML file, an operator executes all necessary commands and returns “not quite real” secret with which we can keep on working (see below). Then, based on the variables provided above, the command and the name of a secret will be formed.
What kind of command is it? When creating a user for object storage, Rook Operator will execute this inside the pod:
radosgw-admin user create --uid={{ .Values.s3.username }} --display-name={{ .Values.s3.username }} --rgw-realm={{ .Values.s3.storeName }} --rgw-zonegroup={{ .Values.s3.storeName }}It generates the following JSON structure:
{
    'user_id': '{{ .Values.s3.username }}',
    'display_name': '{{ .Values.s3.username }}',
    'keys': [
        {
           'user': '{{ .Values.s3.username }}',
           'access_key': 'NRWGT19TWMYOB1YDBV1Y',
           'secret_key': 'gr1VEGIV7rxcP3xvXDFCo4UDwwl2YoNrmtRlIAty'
        }
    ],
    ...
}
Keys will be used in future providing applications with access to the object store via the S3 API. Rook Operator generously collects them and adds to its namespace as a secret in the form of rook-ceph-object-user-{{ .Values.s3.crdName }}-{{ .Values.s3.username }}.
In order to use the data from the secret, all you have to do is to pass them into the container via environment variables. Here is an example of a Job template that automatically creates buckets for every user environment:
{{- range $bucket := $.Values.s3.bucketNames }}
apiVersion: batch/v1
kind: Job
metadata:
  name: create-{{ $bucket }}-bucket-job
  namespace: kube-rook
  annotations:
    'helm.sh/hook': post-install, post-upgrade
    'helm.sh/hook-weight': '2'
spec:
  template:
    metadata:
      name: create-{{ $bucket }}-bucket-job
    spec:
      restartPolicy: Never
      initContainers:
      - name: waitdns
        image: alpine:3.6
        command: ['/bin/sh', '-c']
        args:
        - 'while ! getent ahostsv4 rook-ceph-rgw-{{ $.Values.s3.storeName }}; do sleep 1; done'
      - name: config
        image: rook/toolbox:v0.7.1
        command: ['/bin/sh', '-c']
        args:
        - >-
          s3cmd --configure --access_key=$(ACCESS-KEY) --secret_key=$(SECRET-KEY)
          --no-ssl --dump-config
          --host=rook-ceph-rgw-{{ $.Values.s3.storeName }}
          --host-bucket=rook-ceph-rgw-{{ $.Values.s3.storeName }}
          | tee /config/.s3cfg
        volumeMounts:
          - name: config
            mountPath: /config
        env:
        - name: ACCESS-KEY
          valueFrom:
            secretKeyRef:
              name: rook-ceph-object-user-{{ $.Values.s3.storeName }}-{{ $.Values.s3.username }}
              key: AccessKey
        - name: SECRET-KEY
          valueFrom:
            secretKeyRef:
              name: rook-ceph-object-user-{{ $.Values.s3.storeName }}-{{ $.Values.s3.username }}
              key: SecretKey
      containers:
      - name: create-bucket
        image: rook/toolbox:v0.7.1
        command: ['s3cmd', 'mb', 's3://{{ $bucket }}']
        ports:
        - name: s3-no-sll
          containerPort: 80
        volumeMounts:
        - name: config
          mountPath: /root
      volumes:
      - name: config
        emptyDir: {}
---
{{- end }}
All actions in this Job have been performed exclusively inside the Kubernetes. Structures described in YAML files have been added to the Git repository to be reused. This ability is just awesome for DevOps engineers and the overall CI/CD process. Currently, the Rook team has plans to use Bucket Provisioning Library that will make your work with S3 buckets even more convenient. (UPDATE: This PR was merged later in August.)
Dealing with RADOS via Rook
The traditional Ceph + RBD combination imposes specific restrictions on mounting volumes to pods.
In essence, the namespace must contain the secret for access to Ceph for a stateful application to function. It is easy to do if you have, say, 2–3 environments in your namespaces: you can copy the secret manually. But what if a separate environment with its own namespace is created for every feature?
We have solved this problem leveraging shell-operator that automatically copies secrets to new namespaces:
#!/bin/bashif [[ $1 == '--config' ]]; then
   cat {'onKubernetesEvent':[
 {'name': 'OnNewNamespace',
  'kind': 'namespace',
  'event': ['add']
  }
]}
EOF
else
    NAMESPACE=$(kubectl get namespace -o json | jq '.items | max_by( .metadata.creationTimestamp ) | .metadata.name')
    kubectl -n ${CEPH_SECRET_NAMESPACE} get secret ${CEPH_SECRET_NAME} -o json | jq '.metadata.namespace='${NAMESPACE}'' | kubectl apply -f -
fi
However, this problem does not exist if you use Rook. The mounting process is based on the Flexvolume or CSI (currently in beta) drivers and does not require secrets.
Rook automatically solves various issues all by itself, that’s why we tend to use it in our new projects.
Experimenting with Rook
Let’s conclude the practical part by installing Rook and Ceph so you could experiment with them. To make an installation process easier, developers provide a Helm package. Let’s download it:
$ helm fetch rook-master/rook-ceph --untar --version 1.0.0You can find many various settings in the rook-ceph/values.yaml file. The most important thing here is to specify tolerations for discover/agents. While we’re not going to discuss taints & tolerations in Kubernetes a lot, we’ll just tell that we do not want to schedule pods with the application to the nodes with the data storage disks. Our reasoning is obvious: by doing this, we prevent Rook agents from impacting the application itself.
Now it’s time to open rook-ceph/values.yaml in your favorite text editor and add the following section to the end of this file:
discover:
  toleration: NoExecute
  tolerationKey: node-role/storage
agent:
  toleration: NoExecute
  tolerationKey: node-role/storage
  mountSecurityMode: Any
Let’s also add the corresponding taint for every node reserved for data storage:
$ kubectl taint node ${NODE_NAME} node-role/storage='':NoExecute… and install the Helm chart using the following command:
$ helm install --namespace ${ROOK_NAMESPACE} ./rook-cephWe are ready to create the cluster and specify the path to OSD:
apiVersion: ceph.rook.io/v1
kind: CephCluster
metadata:
  clusterName: 'ceph'
  finalizers:
  - cephcluster.ceph.rook.io
  generation: 1
  name: rook-ceph
spec:
  cephVersion:
    image: ceph/ceph:v13
  dashboard:
    enabled: true
  dataDirHostPath: /var/lib/rook/osd
  mon:
    allowMultiplePerNode: false
    count: 3
  network:
    hostNetwork: true
  rbdMirroring:
    workers: 1
  placement:
    all:
      tolerations:
      - key: node-role/storage
        operator: Exists
  storage:
    useAllNodes: false
    useAllDevices: false
    config:
      osdsPerDevice: '1'
      storeType: bluestore
    nodes:
    - name: ceph01
      deviceFilter: ^sd[b-i]
    - name: ceph02
      deviceFilter: ^sd[b-i]
    - name: ceph03
      deviceFilter: ^sd[b-i]
The status of Ceph should be HEALTH_OK:
$ kubectl -n ${ROOK_NAMESPACE} exec $(kubectl -n ${ROOK_NAMESPACE} get pod -l app=rook-ceph-operator -o name -o jsonpath='{.items[0].metadata.name}') -- ceph -sLet’s also make sure that pods with the application aren’t scheduled to the nodes reserved for Ceph:
$ kubectl -n ${APPLICATION_NAMESPACE} get pods -o custom-columns=NAME:.metadata.name,NODE:.spec.nodeNameNow you can customize additional components. The information about them is available in the docs. To make the further operation of this cluster more comfortable, we strongly recommend enabling dashboard and deploying toolbox.
Nobody’s perfect: what Rook lacks?
As you can see, the development of Rook progresses nicely. Yet there are still problems that don’t let us fully abandon the manual configuration of Ceph:
- No Rook driver can export metrics that show the usage of mounted blocks so we cannot monitor their status. (Rook v1.0.3 has brought us this feature for the Flexvolume volume.)
- Flexvolume and CSI (unlike RBD) cannot resize volumes, so Rook lacks this useful (and sometimes critically important) tool. (After this article has been written, methods of its implementation have appeared but again for Flexvolume only; however it is discussed for CSI as well.)
- Rook is still not as flexible as Ceph. For example, to store the CephFS metadata on SSD and the related data on the HDD, you have to manually define each group of devices in the CRUSH maps.
- Despite the fact that rook-ceph-operator is considered stable, at the moment, certain issues arise during Ceph upgrade from 13 to 14 version.
Conclusion
“Today Rook is guarded against the outer world by pawns, but one day it will play a crucial role in the game!” (This quote has been invented specifically for this article.)
We undoubtedly like the Rook project and believe it absolutely deserves your attention despite all the pros and cons.

Comments