Technologies evolve all the time, and the number of reasons to upgrade your MySQL to the latest versions grows with every passing day. Not long ago, the time came to migrate one of those good old Percona Server 5.7 clusters to v8.0. All this happened on the platform running Ubuntu Linux 16.04. In this article, we will show you how to perform such a task with minimum downtime and share details about the challenges we’ve encountered during this upgrade.
Getting ready
Any DB server version’s upgrade most likely involves adjusting its configuration according to changing system resource limits and new directives in configs (at least, you need to get rid of deprecated features).
The official documentation is a good starting point for upgrading:
- MySQL 8 release notes;
- MySQL upgrading guide;
- upgrading guide by Percona;
- MySQL guide to upgrading a replication setup.
And here is our initial plan of actions:
- Revamp configuration files by deleting outdated directives.
- Check the compatibility via specific tools.
- Upgrade slave databases by installing the
percona-server-serverpackage. - Upgrade the master by installing the same package.
Now, let us analyze each point of the plan and try to imagine what can go wrong.
Caution! Upgrading the Galera-based MySQL cluster has its own subtleties that are not covered in this article. Do not use this guide with the Galera-based MySQL cluster!
Part 1: Checking configs
As you probably know, MySQL 8.0 no longer supports query_cache. As a matter of fact, it was deprecated in version 5.7 already, while in version 8.0, the support for Query Cache was permanently removed. While you need to remove the corresponding directives, you still can use some third-party tools, such as ProxySQL, for caching queries.
We have also discovered outdated directives related to innodb_file_format in the config file. In MySQL 5.7, there’s been an option to choose the InnoDB file format, but MySQL 8.0 supports the Barracuda format only.
In the end, we opted to delete the following directives:
query_cache_type,query_cache_limitandquery_cache_size;innodb_file_formatandinnodb_file_format_max.
To check if everything works as intended, let us use the Docker image with Percona Server. Copy the server’s configuration file to the mysql_config_test directory and create directories for data and logs next to it. Here is an example of testing the configuration of percona-server:
# Init directory structure
mkdir -p {mysql_config_test,mysql_data,mysql_logs}# Copy configs
cp -r /etc/mysql/conf.d/* mysql_config_test/# Run Docker image to test configuration
docker run  --name some-percona -v $(pwd)/mysql_config_test:/etc/my.cnf.d/  -v $(pwd)/mysql_data/:/var/lib/mysql/ -v $(pwd)/mysql_logs/:/var/log/mysql/ -e MYSQL_ROOT_PASSWORD=${MYSQL_PASSWORD} -d percona:8-centos
Now, you can check a file containing information on directives causing any problems. You may find it either in the Docker logs or the logs directory — its location depends on your settings.
Here is what we’ve got:
2020-04-03T12:44:19.670831Z 0 [Warning] [MY-011068] [Server] The syntax 'expire-logs-days' is deprecated and will be removed in a future release. Please use binlog_expire_logs_seconds instead.
2020-04-03T12:44:19.671678Z 0 [Warning] [MY-013242] [Server] --character-set-server: 'utf8' is currently an alias for the character set UTF8MB3, but will be an alias for UTF8MB4 in a future release. Please consider using UTF8MB4 in order to be unambiguous.
2020-04-03T12:44:19.671682Z 0 [Warning] [MY-013244] [Server] --collation-server: 'utf8_general_ci' is a collation of the deprecated character set UTF8MB3. Please consider using UTF8MB4 with an appropriate collation instead.
As you can see, we also had to deal with character sets and remove the outdated expire-logs-days directive.
Part 2: Checking running installations
The upgrade documentation mentions two tools for checking the database for compatibility. Using them, the administrator can verify the compatibility of the existing data structure.
Let’s start with the mysqlcheck maintenance tool. Just run it:
mysqlcheck -u root -p --all-databases --check-upgradeIf no problems are found, the utility will exit with zero status code:
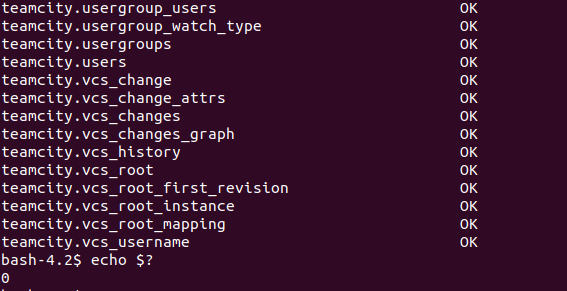
Also, the mysql-shell tool is available in the modern MySQL versions (if you use Percona Server, this package is called percona-mysql-shell). It replaces the classic mysql client and combines functions of a client, SQL code editor, and MySQL administration tool. You can run the following command to check the server before upgrading:
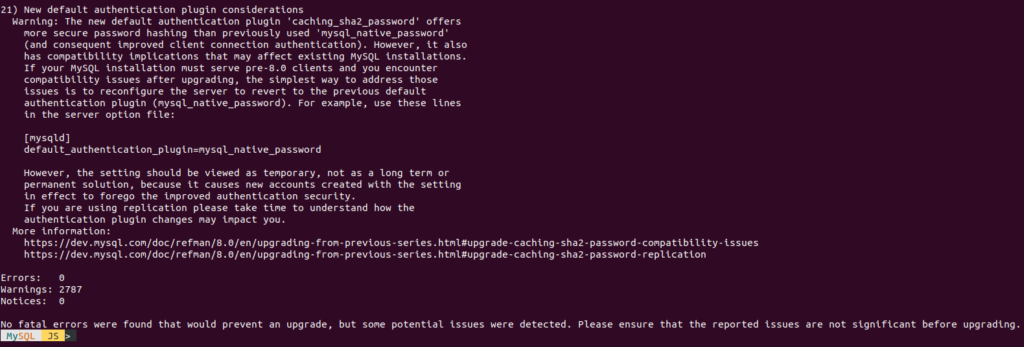
mysqlsh -- util check-for-server-upgrade { --user=root --host=1.1.1.1 --port=3306 } --config-path=/etc/mysql/my.cnfWe’ve got the following warnings:
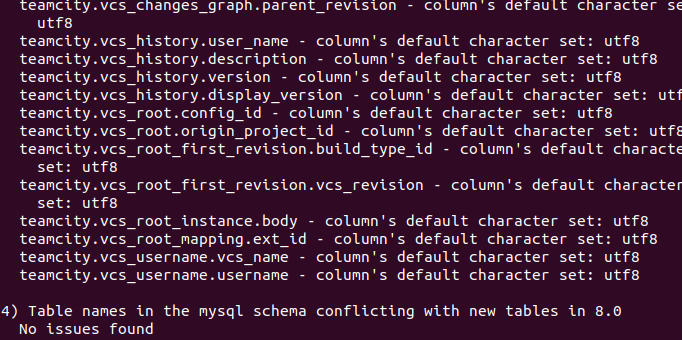
It looks like nothing serious, only warnings about encodings (see below). Here is the final output:
So, given all that, we felt that the upgrade should go smoothly.
But first, we would like to make a little remark regarding the encoding warnings mentioned above. The thing is that UTF-8 encoding in MySQL was not “real” UTF-8 until recently. That “fake” UTF-8 encoding has used 3 bytes instead of 4 to encode characters. In MySQL 8, developers decided to deprecate the old utf8mb3 character set. Thus, the utf8 alias has become a reference to utf8mb4. The utf8mb3 character set will be removed in future MySQL releases. We’ve decided to fix the encodings on the running DBMS installation after upgrading it.
Part 3: Upgrading MySQL servers
What can go wrong if we have such a great plan (at least, we think so)? Well, there is always a catch, so we decided to conduct our first run on a dev cluster.
As it has been mentioned already, the official documentation covers the issue of upgrading a replication setup. The bottom line is that you first should upgrade all the (slave) replicas since MySQL 8 knows how to perform replication from a master node running MySQL 5.7. The process is complicated by the fact that we use a master <-> master mode, with our remote master working in the read-only mode. In other words, all production traffic goes to the first data center while the second one serves as a backup.
Here is how our MySQL cluster is configured:
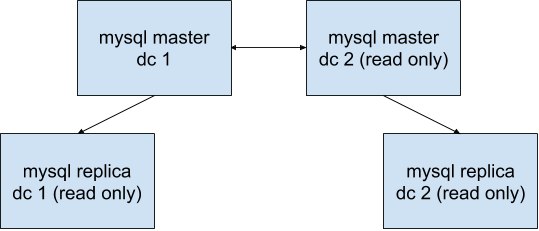
So we have to start with upgrading mysql replica dc 2, mysql master dc 2, and mysql replica dc 1, and then proceed to the mysql master dc 1 server. For higher reliability, we stopped virtual machines, made their snapshots, and stopped replication via the STOP SLAVE command immediately before upgrading. The following pattern looks like this:
- Add
skip-networking,skip-slave-start,skip-log-bindirectives to the config and restart each replica. We need that because the upgrade process generates binlogs affecting system tables. These directives ensure that the database will not change application data, and binary logs will not contain information about updating system tables. This will allow us to avoid problems when the replication is resumed. - Install the
percona-server-serverpackage. Bear in mind that MySQL 8 does not require you to run themysqlupgradecommand after upgrading the server. - After a successful start, restart the server once again, only this time without the parameters we added at the first step.
- Make sure the replication is running successfully: a) check the
SHOW SLAVE STATUSoutput, b) see if the tables with counters in the application’s database are being updated.
Well, it all looks easy enough: the upgrade of our dev cluster was successful. Time to switch to the careful planning of a nightly production upgrade…
One does not simply upgrade the production…
However, our try to transfer our positive dev experience to the production cluster was not that smooth.
Fortunately, the process starts with upgrading replicas. Thus, when we encountered difficulties, we stopped it and recovered the replica using the snapshot. Broader investigations were postponed until the next morning. Here is what we found in the logs:
2020-01-14T21:43:21.500563Z 2 [ERROR] [MY-012069] [InnoDB] table: t1 has 19 columns but InnoDB dictionary has 20 columns
2020-01-14T21:43:21.500722Z 2 [ERROR] [MY-010767] [Server] Error in fixing SE data for db1.t1
2020-01-14T21:43:24.208365Z 0 [ERROR] [MY-010022] [Server] Failed to Populate DD tables.
2020-01-14T21:43:24.208658Z 0 [ERROR] [MY-010119] [Server] Aborting
We dived deep into the archives of various mailing lists and found out that this problem occurs due to a MySQL bug #87229. Or, more precisely, it is a bug related to mysqlcheck and mysqlsh utilities.
It turns out that MySQL developers have changed the way data is represented in decimal fields (int, tinyint, etc.) so that they are stored differently in mysql-server. If your database was created in version 5.5 or 5.1, and later you upgraded it to version 5.7, you may need to OPTIMIZE some tables. This way, MySQL will update the data files and convert them to the relevant format.
You can also check the format using the mysqlfrm utility:
mysqlfrm --diagnostic -vv /var/lib/mysql/db/table.frm
...
 'field_length': 8,
  'field_type': 246, # that's the field type
  'field_type_name': 'decimal',
  'flags': 3,
  'flags_extra': 67,
  'interval_nr': 0,
 'name': 'you_decimal_column',
...
If the field_type is 0, then the table uses the old type, and you have to perform OPTIMIZE. However, if the field_type is 246, then it has the new type already. More information about types is available in the source code.
NB! In this bug thread, developers also discuss another possible cause of the problem (happily, it did not affect us): the absence of InnoDB tables in the INNODB_SYS_TABLESPACES system table if those tables were created in version 5.1. The attached SQL script allows you to avoid problems when upgrading.
Then why didn’t we encounter such a problem during the dev upgrade? The thing is that the database is periodically copied from production to dev, so the tables are re-created.
Unfortunately, there is no way to OPTIMIZE a sufficiently large running database all at once. The percona-toolkit would help it this case: specifically, the pt-online-schema-change tool is perfect for doing the online OPTIMIZE’ing.
Here is our updated plan:
- Optimize all tables.
- Upgrade databases.
To give it a try (and to find out the duration of the upgrade process), we switched off one of the replicas and ran the following command on all of its tables:
pt-online-schema-change --critical-load Threads_running=150 --alter "ENGINE=InnoDB" --execute --chunk-size 100 --quiet --alter-foreign-keys-method auto h=127.0.0.1,u=root,p=${MYSQL_PASSWORD},D=db1,t=t1Tables are updated without lengthy locks thanks to the fact that pt-online-schema-change creates a temporary table and copies data from the main table to it. At the moment when both tables are identical, the source table is blocked and replaced with the new one. The test run showed that it would take about a day to update all the tables. However, copying data has caused an excessive load on disk drives.
To prevent this, we added the --sleep 10 option to the command in the production cluster. This option specifies the length of the waiting period after copying each data chunk to a new table. You can reduce the load if the running application is sensitive to a response time that way.
After our tables optimization finished, the upgrade was successful.
… but even that was not the end of the story!
Within half an hour after the upgrade, we’ve been informed about unexpected issues. The database behaved strangely: the connections were discarded periodically. Here is how this problem manifested itself in our monitoring tools:
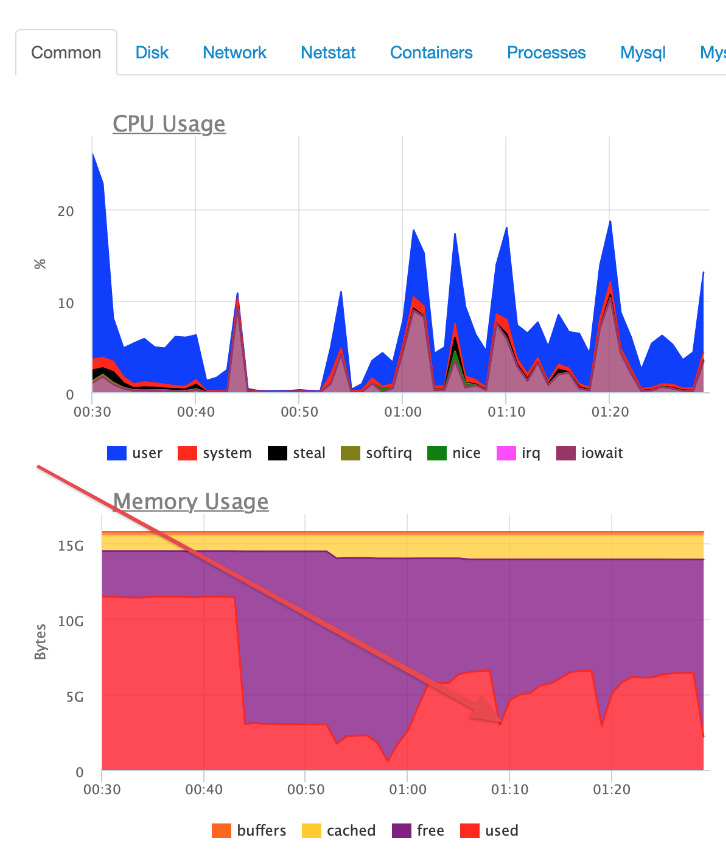
As you can see, there was some sawtooth-shaped activity. It was caused by the MySQL server threads failing periodically. There were multiple errors:
[PDOException] SQLSTATE[HY000] [2002] Connection refusedA quick look at the logs revealed that the mysqld daemon could not attain the required resources from the operating system. While searching for a solution, we stumbled upon orphan apparmor-policy files in the system:
# dpkg -S /etc/apparmor.d/cache/usr.sbin.mysqld
dpkg-query: no path found matching pattern /etc/apparmor.d/cache/usr.sbin.mysqld
# dpkg -S /etc/apparmor.d/local/usr.sbin.mysqld
dpkg-query: no path found matching pattern /etc/apparmor.d/local/usr.sbin.mysqld
# dpkg -S /etc/apparmor.d/usr.sbin.mysqld
mysql-server-5.7: /etc/apparmor.d/usr.sbin.mysqld
# dpkg -l mysql-server-5.7
rc  mysql-server-5.7 5.7.23-0ubuntu0.16.04.1      amd64
These files were created a couple of years ago during the upgrade to MySQL 5.7 and belong to a deleted package. We removed these files and restarted the apparmor service to solve the problem:
systemctl stop apparmor
rm /etc/apparmor.d/cache/usr.sbin.mysqld
rm /etc/apparmor.d/local/usr.sbin.mysqld
rm /etc/apparmor.d/usr.sbin.mysqld
systemctl start apparmor
Conclusion
Any, even an elementary, operation can lead to an unexpected outcome. And having a well-thought-out plan does not always guarantee the awaited result. From now on, any upgrading plans of our team necessarily include mandatory cleaning of unneeded/redundant files that may emerge as a result of its previous activities.
P.S. Thank you, Percona, for your excellent products!



Comments