

Starting from the basics of Kubernetes networking and managing its network policies, we’ll discuss a third-party network plugin called Calico that greatly enhances built-in features. We will show the ease of configuring it as well as some of its functionality — all these through real-life examples based on our experience.
A quick introduction to Kubernetes networking
The network is an integral part of every Kubernetes cluster. There are many in-depth articles describing the fundamentals of Kubernetes networking, such as An illustrated guide to Kubernetes Networking or An Introduction to Kubernetes Network Policies for Security People.
In the context of this article, it should be noted that K8s isn’t responsible for network connectivity between containers: for this, various CNI (Container Networking Interface) plugins are used.
For example, the most popular of such plugins, Flannel, enables full network connectivity between all cluster nodes by running a small binary agent on each node. With it, Flannel allocates a subnet to each host. However, full and unregulated network accessibility is not always good. To ensure minimum isolation in the cluster, you have to deal with the firewall configuration. Generally, the CNI itself is in charge of such a configuration, that is why any third-party attempts to modify iptables rules might be interpreted incorrectly or ignored altogether.
Out-of-the-box, Kubernetes provides NetworkPolicy API for managing network policies in the cluster. This resource is applied to selected namespaces and may contain rules for limiting access of one application to another. It also provides means for configuring accessibility of specific pods, environments (namespaces), or IP-address blocks:
apiVersion: networking.k8s.io/v1
kind: NetworkPolicy
metadata:
  name: test-network-policy
  namespace: default
spec:
  podSelector:
    matchLabels:
      role: db
  policyTypes:
  - Ingress
  - Egress
  ingress:
  - from:
    - ipBlock:
        cidr: 172.17.0.0/16
        except:
        - 172.17.1.0/24
    - namespaceSelector:
        matchLabels:
          project: myproject
    - podSelector:
        matchLabels:
          role: frontend
    ports:
    - protocol: TCP
      port: 6379
  egress:
  - to:
    - ipBlock:
        cidr: 10.0.0.0/24
    ports:
    - protocol: TCP
      port: 5978
The above not-so-basic example from the official documentation might discourage you once and for all from trying to understand the logic of operation of network policies. Let’s try to sift through the basic principles and methods of processing traffic flows using network policies.
As you can easily guess, there are two types of traffic: incoming to pod (Ingress) and outgoing from it (Egress).
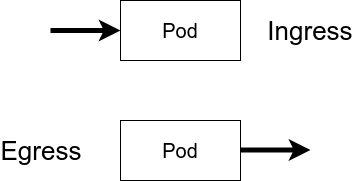
Obviously, the policy is divided into two categories depending on the direction of traffic.
The selector is the next mandatory attribute: each rule is applied to some selector(s). It could represent a pod (or a group of pods), or an environment (i.e., a namespace). An important feature is that both types of above objects must contain a label since policies operate on these labels.
In addition to the finite number of selectors united by some label, you can define broader rules such as “Allow/Deny everything/to all” in different variations. For this, the following expressions are used:
podSelector: {}
  ingress: []
  policyTypes:
  - Ingress
In the above example, all pods of an environment are blocked from incoming traffic. You can achieve the opposite behavior with this expression:
podSelector: {}
  ingress:
  - {}
  policyTypes:
  - Ingress
And here is the same expression for denying outgoing traffic:
podSelector: {}
  policyTypes:
  - Egress
To allow it, use:
podSelector: {}
  egress:
  - {}
  policyTypes:
  - Egress
But let’s get back to the problem of selecting a suitable CNI plugin for the cluster. It is worth noting that not every network plugin supports NetworkPolicy API. For example, Flannel cannot configure network policies, which is explicitly stated in the official repository. The Flannel developers kindly suggest an alternative — Calico, the Open Source project that significantly extends the features of the built-in Kubernetes API in terms of network policies.
![]()
Intro to Calico: a bit of theory
You can use the Calico plugin as a stand-alone tool or with Flannel (via Canal subproject) to implement network connectivity features and to manage accessibility.
What are the advantages of using the built-in Kubernetes features together with the Calico APIs?
Well, here is the list of NetworkPolicy’s features:
- policies are limited to an environment;
- policies are applied to pods marked with labels;
- you can apply rules to pods, environments or subnets;
- the rules may contain protocols, numerical or named ports.
And here is how Calico extends these features:
- policies can be applied to any object: pod, container, virtual machine or interface;
- the rules can contain the specific action (restriction, permission, logging);
- you can use ports, port ranges, protocols, HTTP/ICMP attributes, IPs or subnets (v4 and v6), any selectors (selectors for nodes, hosts, environments) as a source or a target of the rules;
- also, you can control traffic flows via DNAT settings and policies for traffic forwarding.
The first commits to the Calico repository on GitHub were made in July 2016, and, within a year, the project established itself as a leader in the field of Kubernetes network connectivity. For example, here are the results of a survey conducted by The New Stack in 2017:
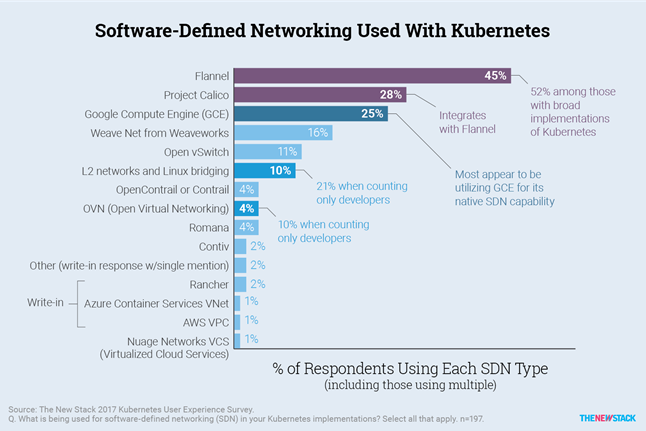
Many leading managed Kubernetes solutions such as Amazon EKS, Azure AKS, Google GKE, and others, started to recommend it.
Calico truly shines when it comes to performance. When testing its product, the Calico development team has shown impressive figures by launching over 50000 containers on 500 physical nodes while creating 20 containers per second. Thus, Calico has no problems with scaling. (These results were provided during the announcement of the first version.) Independent testing of throughput and resource consumption confirms Calico’s high performance, which is almost at par with Flannel’s. For example:

The project grows actively and supports many popular managed K8s solutions, OpenShift, OpenStack. Also, you can use Calico when deploying a cluster with kops or use it for building Service Meshes (here is an example of using it with Istio).
Using Calico
In the general case of plain vanilla Kubernetes, installing the CNI boils down to applying (kubectl apply -f) the calico.yaml manifest downloaded from the official site of the project.
Usually, the most recent version of the plugin is compatible with at least 2–3 latest versions of Kubernetes. Its reliable operation in older versions isn’t tested and is not guaranteed. According to developers, Calico supports Linux kernels starting with 3.10 running under CentOS 7, Ubuntu 16, or Debian 8 with iptables/IPVS as a basis.
Isolation inside the environment
For general understating, let’s consider an elemental case to see how Calico network policies differ from regular ones and how the approach to composing rules improves their readability and configuration flexibility.

We have two web applications in the cluster, Node.js-based and PHP-based. One of them uses a Redis database. To prevent access to Redis from PHP while preserving connectivity with Node.js, you can apply the following policy:
kind: NetworkPolicy
apiVersion: networking.k8s.io/v1
metadata:
  name: allow-redis-nodejs
spec:
  podSelector:
    matchLabels:
      service: redis
  ingress:
  - from:
    - podSelector:
        matchLabels:
          service: nodejs
    ports:
    - protocol: TCP
      port: 6379
Essentially, we allowed incoming traffic from Node.js to the Redis port. We did not block the rest of the traffic explicitly. However, once we define the NetworkPolicy, all the selectors mentioned in it become isolated (unless we specify otherwise). At the same time, isolation rules do not apply to objects which are not covered by the selector.
In our example, we use out-the-box Kubernetes apiVersion, but you can use the same resource from Calico. The syntax is more detailed there, so you need to rewrite the rule for the above case in the following form:
apiVersion: crd.projectcalico.org/v1
kind: NetworkPolicy
metadata:
  name: allow-redis-nodejs
spec:
  selector: service == 'redis'
  ingress:
  - action: Allow
    protocol: TCP
    source:
      selector: service == 'nodejs'
    destination:
      ports:
      - 6379
The above expressions for allowing or denying all traffic via the regular NetworkPolicy API contain constructions with curly/square brackets, challenging for perceiving and remembering. In the case of Calico, you can easily alter the logic of a firewall rule to the opposite by replacing action: Allow with action: Deny.
Isolation through environments
Now, suppose that an application generates business metrics for collecting them in Prometheus and further analysis with Grafana. Metrics might include some sensitive data that is unprotected and is available for all to see by default. Let’s protect that data:
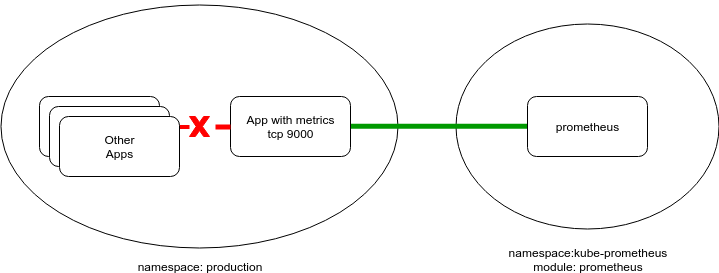
Usually, Prometheus runs in a separate service environment. In our example, we have the following namespace:
apiVersion: v1
kind: Namespace
metadata:
  labels:
    module: prometheus
  name: kube-prometheus
The metadata.labels field plays an important role here. As mentioned above, namespaceSelector (as well as podSelector) works with labels. Therefore, you have to add a new label (or use the existing one) to enable collecting metrics from all pods on a particular port, and then apply a configuration like that:
apiVersion: networking.k8s.io/v1
kind: NetworkPolicy
metadata:
  name: allow-metrics-prom
spec:
  podSelector: {}
  ingress:
  - from:
    - namespaceSelector:
        matchLabels:
          module: prometheus
    ports:
    - protocol: TCP
      port: 9100
And in the case of Calico policies, the syntax would be as it follows:
apiVersion: crd.projectcalico.org/v1
kind: NetworkPolicy
metadata:
  name: allow-metrics-prom
spec:
  ingress:
  - action: Allow
    protocol: TCP
    source:
      namespaceSelector: module == 'prometheus'
    destination:
      ports:
      - 9100
Basically, by adding this kind of policy customized to specific needs, you can protect yourself against malicious or accidental interference in the operation of applications in the cluster.
Calico developers adhere to the Default Deny principle, meaning that all traffic is denied by default unless explicitly allowed. They articulate their position in the official documentation (others follow a similar approach, as is evident in the already mentioned article).
Using Calico’s extended set of objects
I want to remind you that the extended Calico API allows you to control the accessibility of nodes and not just pods. In the following example, we will block the passing of ICMP requests in the cluster (e.g., pings from a pod to a node or vice versa; pings between pods) using GlobalNetworkPolicy:
apiVersion: crd.projectcalico.org/v1
kind: GlobalNetworkPolicy
metadata:
  name: block-icmp
spec:
  order: 200
  selector: all()
  types:
  - Ingress
  - Egress
  ingress:
  - action: Deny
    protocol: ICMP
  egress:
  - action: Deny
    protocol: ICMP
In the above case, the cluster nodes are still able to reach each other over ICMP. You can solve that problem by applying GlobalNetworkPolicy to the HostEndpoint resource:
apiVersion: crd.projectcalico.org/v1
kind: GlobalNetworkPolicy
metadata:
  name: deny-icmp-kube-02
spec:
  selector: "role == 'k8s-node'"
  order: 0
  ingress:
  - action: Allow
    protocol: ICMP
  egress:
  - action: Allow
    protocol: ICMP
---
apiVersion: crd.projectcalico.org/v1
kind: HostEndpoint
metadata:
  name: kube-02-eth0
  labels:
    role: k8s-node
spec:
  interfaceName: eth0
  node: kube-02
  expectedIPs: ["192.168.2.2"]
The case with VPN
Finally, here is another real-life example from our experience of using Calico features in the case of out-of-the-cluster interaction when the standard policy set is not enough. Clients use a VPN tunnel to access a web application. We exercise strict controls over that access and limit the list of authorized services:
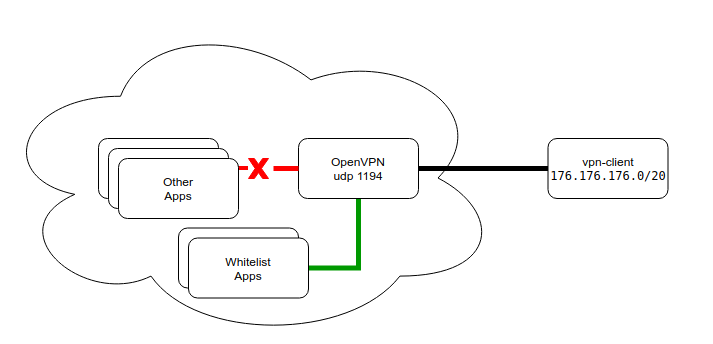
Clients connect to a VPN at the standard UDP port (1194). After successful connection, they receive routes to cluster subnets of pods and services. Subnets are fully pushed to ensure the operation of services in the case of restarts and address changes.
The port in the configuration is the standard one, which brings some intricacies to the process of configuring an application and deploying it to the Kubernetes cluster. For example, in AWS, the UDP LoadBalancer was introduced only at the end of last year in a limited set of regions. At the same time, you cannot use NodePort because it is forwarded to all cluster nodes and unable to scale the number of server instances for improving fault tolerance. Also, you would have to alter the default port range.
We have analyzed all possible solutions and settled on the following one:
- VPN pods are scheduled to the node in the
hostNetworkmode (i.e., on actual IP addresses). - The service is exposed outside through the ClusterIP. Then, we configure a port on the node that is accessible from the outer world… but with some reservations (such as the presence of a real IP address).
- Identifying the node where the pod has been started is beyond the scope of this article. For example, you can explicitly attach a service to a node or to implement a basic sidecar service that will be tracking the current IP address of the VPN service and making adjustments to clients’ DNS records — the specific implementation depends on your imagination and needs.
From the routing standpoint, we can unambiguously identify the client behind the VPN by its IP address issued by the VPN server. Below is a basic example of limiting access to services for such a client (the case with Redis):
apiVersion: crd.projectcalico.org/v1
kind: HostEndpoint
metadata:
  name: vpnclient-eth0
  labels:
    role: vpnclient
    environment: production
spec:
  interfaceName: "*"
  node: kube-02
  expectedIPs: ["172.176.176.2"]
---
apiVersion: crd.projectcalico.org/v1
kind: GlobalNetworkPolicy
metadata:
  name: vpn-rules
spec:
  selector: "role == 'vpnclient'"
  order: 0
  applyOnForward: true
  preDNAT: true
  ingress:
  - action: Deny
    protocol: TCP
    destination:
      ports: [6379]
  - action: Allow
    protocol: UDP
    destination:
      ports: [53, 67]
Here, we prohibit connections to the port 6379 while preserving operability of the DNS service (functionality of which often suffers when defining the rules). As I previously mentioned, once a selector appears, a restrictive policy is applied to it by default (unless specified otherwise).
Conclusion
As you can see, an extended Calico API allows you to flexibly configure and dynamically modify the routing in the cluster and outside of it. In most cases, the use of Calico might seem overwhelming, as well as implementing the L3 network with BGP and IP-IP tunnels feels monstrous compared to a simple Kubernetes installation in the flat network… But overall, the tool looks quite promising and viable.
Sometimes the isolation of the cluster for proper security is pretty challenging. In these cases, Calico (or a similar tool) comes to the rescue. We use the examples provided above (with minor modifications) in several AWS installations of our customers.

Comments