

When using Ceph as a network storage in projects with various loads, we may face different tasks that do not seem trivial. Here are a few examples:
- migrating data into the new Ceph instance with partial use of past servers in the new cluster;
- solving the problem of allocation of disk space in Ceph.
To deal with these tasks we need to correctly remove OSDs while keeping the data intact. It is especially important in the case of massive volumes of data. That is what we will cover in this article.
The methods described below are suitable for any version of Ceph (unless special notes are given). In addition, we are going to take into account the fact that huge amounts of data can be stored in Ceph, thus we will split some steps into smaller ones — to prevent data loss and other problems.
A few words about the OSD
Since two of the three cases in this article are related to the OSD (Object Storage Daemon), we would like to briefly discuss the OSD and its importance before diving into the practical part.
First of all, it should be noted that the entire Ceph cluster consists of a set of OSDs. The more of them are there, the greater the free volume of data in Ceph. Consequently, the main purpose of OSDs is to store object data across cluster nodes and provide network access to them (for reading, writing, and other queries).
The replication parameters are set at the same level through copying objects between different OSDs. And this is where you may encounter various problems (we will provide solutions later in the article).
Case #1. Gracefully taking out OSDs from the Ceph cluster
The need to take out an OSD from the cluster may be caused by reducing the cluster size (for example, to replace some server with another one). This is exactly what happened to us and inspired us to write this article. Thus, our ultimate goal is to remove all OSDs and Monitors on the server so that it can be stopped.
For the sake of convenience and to avoid situations with selecting the wrong OSD when executing commands, let us define a separate variable containing the number of the required OSD. We will refer to it as ${ID}. From now on, this variable will be replacing the number of the OSD that we are working with.
Firstly, let’s look at the OSD map:
root@hv-1 ~ # ceph osd tree
ID CLASS WEIGHT  TYPE NAME      STATUS REWEIGHT PRI-AFF
-1       0.46857 root default
-3       0.15619      host hv-1
-5       0.15619      host hv-2
 1   ssd 0.15619      osd.1     up     1.00000  1.00000
-7       0.15619      host hv-3
 2   ssd 0.15619      osd.2     up     1.00000  1.00000
In order to take the OSD out of the cluster, we have to reweight it down to zero. This way, we are reducing the amount of data in the OSD by rebalancing them to other OSDs. To do this, run the following commands:
ceph osd reweight osd.${ID} 0.98
ceph osd reweight osd.${ID} 0.88
ceph osd reweight osd.${ID} 0.78
… and so on until you reach a weight of zero.
But what about norebalance?
Also, there is a solution involving norebalance + backfill. First of all, disable rebalancing:
ceph osd set norebalanceNow, you have to add new OSDs to the CRUSH map and set weights of old ones to 0. Set the primary affinity to 0 for OSDs that are being removed and added:
ceph osd primary-affinity osd.$OLD 0
ceph osd primary-affinity osd.$NEW 0
Then decrease the backfill to 1 and unset the norebalance:
ceph tell osd.* injectargs --osd_max_backfill=1
ceph osd unset norebalance
After that, the data migration will start.
Note: This solution is quite viable, however you have to take into account specific circumstances/requirements. We use the norebalance when we do not want to cause excessive network load if any OSD goes down. osd_max_backfill allows you to limit the rebalance speed. As a result, rebalancing would slow down and reduce the network load.
Following steps
Gradual rebalancing is required to avoid losing data. It is especially true if the OSD contains large volumes of data. To make sure that everything is fine after running reweight commands, you can run ceph -s. Also, you can run ceph -w in a separate window to monitor data migration in real-time.
After the OSD is emptied, you can begin the standard operation of removing it. To do this, set the selected OSD to the down state:
ceph osd down osd.${ID}Now it is time to take the OSD out of the cluster:
ceph osd out osd.${ID}Stop the OSD and unmount its volume:
systemctl stop ceph-osd@${ID}
umount /var/lib/ceph/osd/ceph-${ID}
Remove the OSD from the CRUSH map:
ceph osd crush remove osd.${ID}Remove the OSD authentication key:
ceph auth del osd.${ID}And, finally, remove the OSD:
ceph osd rm osd.${ID}Note: For Ceph versions starting with Luminous (and higher), the above steps can be reduced to:
ceph osd out osd.${ID}
ceph osd purge osd.${ID}
Now, if you run the ceph osd tree command, you should see that the server no longer has OSDs that the above actions have been performed for:
root@hv-1 ~ # ceph osd tree
ID CLASS WEIGHT  TYPE NAME     STATUS REWEIGHT PRI-AFF
-1       0.46857      root default
-3       0.15619      host hv-1
-5       0.15619      host hv-2
-7       0.15619      host hv-3
 2   ssd 0.15619      osd.2    up     1.00000  1.00000
It should be noted that your Ceph cluster state will become HEALTH_WARN and the number of OSDs as well as the amount of available disk space will decrease.
Below we will provide steps that are required to stop the server completely and remove it from Ceph. We should remind you that before stopping the server, you have to take out all OSDs on this server.
After all OSDs are taken out of the server, you can remove the hv-2 server from the CRUSH map by running the following command:
ceph osd crush rm hv-2Delete the monitor from the hv-2 server by running the following command on another server (that is, on hv-1):
ceph-deploy mon destroy hv-2After that, you can stop the server and proceed to further steps (such as redeployment and so on).
Case #2. Allocating disk space in the existing Ceph cluster
Let me start the second case with a few words about Placement Groups (PGs). A placement group in Ceph primarily aggregates Ceph objects and carries out data replication in the OSD. The formula for choosing the right number of placement groups is available in the Ceph documentation. There you can also find examples of how to calculate the required number of PGs.
One of the most common issues when operating Ceph is the discrepancy in the number of OSDs and PGs between Ceph pools. One of the most common issues when operating Ceph is the discrepancy in the number of OSDs and PGs between Ceph pools. Overall, the correct number of PGs ensures a reliable cluster operation. Below, we will look at what could happen otherwise.
The challenge of determining the right amount of PGs is closely linked to the following two problems:
- A way too small number of PGs would lead to a problem of balancing large chunks of data.
- On the other hand, a larger than needed number of PGs would lead to performance issues.
In practice, there is another more dangerous problem: data overflow in one of the OSDs. The reason for this is that Ceph relies on the amount of available data in the OSD when estimating the notional amount of data that can be written to the pool. You can find it in the MAX AVAIL section of the output of the ceph df command for each pool separately. If there is not enough space in at least one OSD, you will not be able to write more data until the data is properly distributed among all OSDs.
We should clarify that these problems can be solved when configuring the Ceph cluster. Ceph PGCalc is one of the tools that might come in handy. It can help you in choosing the right amount of PGs. Besides, it can be used in situations when the Ceph cluster is configured incorrectly. It is worth noting that as part of the fix, you will most likely have to reduce the number of PGs. However, older Ceph versions do not support this feature (it became available starting with Nautilus version).
Okay, let’s imagine the following picture: the cluster has the HEALTH_WARN status due to the fact that one of the OSDs is running out of space (as indicated by the HEALTH_WARN: 1 near full osd error). The algorithm for getting out of this situation is presented below.
First of all, you need to distribute the data among available OSDs. We did the same thing in case #1 when we took out the OSD from the cluster. The only difference is that now we need to decrease the reweight slightly. For example, down to 0.95:
ceph osd reweight osd.${ID} 0.95This way, you can free up disk space in the OSD and fix the ceph health error. However, as I’ve mentioned before, this problem mainly arises due to incorrect initial configuration of Ceph. It is important to reconfigure the cluster to prevent this error from occurring in the future.
In our particular case, it all came down to:
- excessive
replication_countvalue in one of the pools, - an excessive number of PGs in one of the pools and an insufficient number of PGs in another one.
Let’s use the PGCalc calculator. It has all the instructions and is simple to use. After specifying all the necessary parameters, we get the following suggestions:
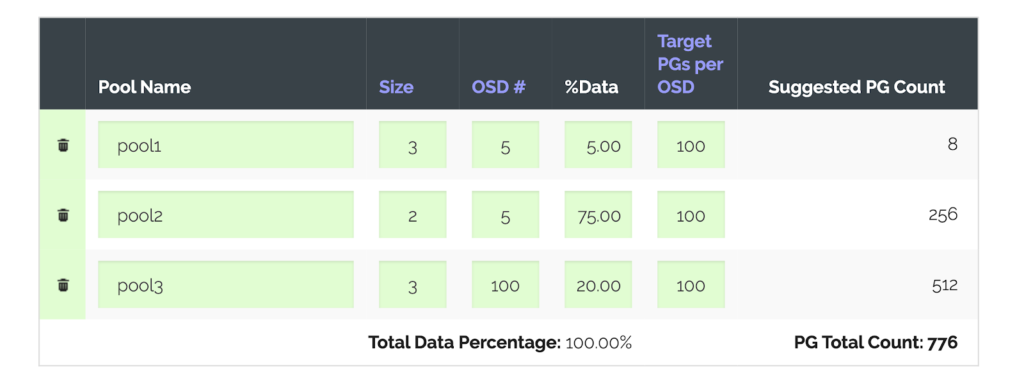
Note: Those who set up a Ceph cluster from scratch might appreciate another highly useful feature of the calculator: it is capable of generating a set of commands that will create pools from scratch using the parameters specified in the table.
The last column, Suggested PG Count, helps you to get the overall idea. In our case, you should also pay attention to the second column (Size) that specifies the number of replicas per pool (since we have modified the replication factor).
So, first, we need to change the replication factor because we can free up disk space by decreasing this parameter. As the command processes, you will see an increase in available disk space:
ceph osd pool $pool_name set $replication_sizeAfter the command is complete, we have to modify the pg_num and pgp_num parameters as follows:
ceph osd pool set $pool_name pg_num $pg_number
ceph osd pool set $pool_name pgp_num $pg_number
Note: We have to change the number of PGs in each pool sequentially (while keeping their number in other pools) until the “Degraded data redundancy” and “n-number of pgs degraded” warnings disappear.
You can use the ceph health detail and ceph -s commands to check if everything went well.
Case #3. Migrating a VM from LVM to Ceph RBD
The question of implementing fault-tolerant storage often arises in a server infrastructure based on virtual machines running on the leased bare-metal servers. Sufficient space in such kind of storage is also essential… Another common situation is that there is a VM with local storage on the server. You want to extend its disk, however no free space is left.
There are various ways to solve this problem. For example, you can migrate to another server (if there is one) or add new disk drives to the server. However, sometimes all these options are not viable. In this case, the migration from LVM to Ceph can be a solution. By choosing this approach, we simplify cross-server migration since there is no need to move local storage from one hypervisor to another. However, there is a catch: you will have to stop the VM until the migration is complete.
Our next steps are based on this great article — we have successfully tested the solution provided there. By the way, it also describes a no-downtime migration. However, we have not checked it since it was not required in our case.
So what are the practical steps? In our example, we use virsh and, accordingly, libvirt. First of all, make sure that the target Ceph pool is connected to libvirt:
virsh pool-dumpxml $ceph_poolThe description of the pool must contain all the necessary information and credentials to connect to Ceph.
The next step involves converting the LVM image to Ceph RBD. The duration of the converting process depends mainly on the size of an image:
qemu-img convert -p -O rbd /dev/main/$vm_image_name
rbd:$ceph_pool/$vm_image_name
After converting is complete, you will still have the LVM image. It would come in handy if migrating the VM to RBD fails, and you have to roll back the changes. To be able to roll back the changes quickly, let us make a backup of the VM’s configuration file:
virsh dumpxml $vm_name > $vm_name.xml
cp $vm_name.xml $vm_name_backup.xml
… and edit the original one (vm_name.xml). Find a description of the disk (it starts with <disk type='file' device='disk'> and ends with </disk>) and modify it as follows:
<disk type='network' device='disk'>
  <driver name='qemu'/>
    <auth username='libvirt'>
      <secret type='ceph' uuid='sec-ret-uu-id'/>
    </auth>
  <source protocol='rbd' name='$ceph_pool/$vm_image_name>
    <host name='10.0.0.1' port='6789'/>
    <host name='10.0.0.2' port='6789'/>
  </source>
  <target dev='vda' bus='virtio'/>
  <alias name='virtio-disk0'/>
  <address type='pci' domain='0x0000' bus='0x00' slot='0x04' function='0x0'/>
</disk>
Taking a closer look at details:
- The
sourceprotocol field contains the path to the storage in Ceph RBD (the address includes Ceph pool/RBD image names which we defined at the first step). - The
secretfield contains thecephtype as well as the UUID of the secret. You can find out the UUID using thevirsh secret-listcommand. - The
hostfield contains addresses of Ceph monitors.
After editing the configuration file is complete and LVM is successfully converted to RBD, you can apply the modified file and start the virtual machine:
virsh define $vm_name.xml
virsh start $vm_name
It is time to check if the VM runs correctly. To do this, you can connect to it over SSH or using the virsh utility.
If the VM runs correctly and there are no hints of any other problems, you can delete the LVM image since it is no longer needed:
lvremove main/$vm_image_nameConclusion
We have encountered all these issues in real-life situations. We hope that the instructions provided here would help our readers to solve similar problems. If you have any ideas or practical experiences of using Ceph, we would be happy to see them in the comments below!

Hello, max. Yeah, the process will be much smoother if you do it like this, but you can also experiment with reweighting 2 or 3 OSD simultaneously. It can be faster, in theory.
hi,
thank you for the post, I found it very useful.
Just a question, when you say
“In order to take the OSD out of the cluster, we have to reweight it down to zero. This way, we are reducing the amount of data in the OSD by rebalancing them to other OSDs. To do this, run the following commands:
ceph osd reweight osd.${ID} 0.98
ceph osd reweight osd.${ID} 0.88
ceph osd reweight osd.${ID} 0.78”
you mean that every “reweight” must be runned after the cluster has ended the recovery, i.e. when all the pools are again in the “active+clean” pg status?
thank you
Hi Max! Just letting you know in this thread that our Maksim replied to you below.