
Skaffold is an Open Source project for CI/CD providing a CLI tool for “easy and repeatable Kubernetes development.” Its first alpha version has been released by Google on March 5, 2018, however it has become quite mature already with its first GA release announced this month (November’19).
Skaffold allows developers to focus on writing code while avoiding tedious administering tasks. What makes it so unique? As it turns out, Skaffold has several tricks up its sleeve, which makes it a perfect instrument for developers. Let’s learn more about the project and its features.
NB: By the way, we have already briefly touched Skaffold in our general overview of tools for developers who use Kubernetes.
Theory. Use cases and features
Skaffold helps to automate CI/CD workflow (building, pushing and deploying) by providing rapid feedback to developers, i.e. the ability to promptly see the result of code changes in the form of an updated application running in Kubernetes. In addition, you can run this application in various environments (dev, stage, production…) by defining relevant pipelines in Skaffold.
Skaffold is written in Golang and available under the Apache License 2.0 on GitHub. Let’s explore its features and peculiarities. Its main features are:
- Skaffold provides a toolkit for creating CI/CD pipelines.
- It monitors changes in the source code, starts an automatic process of building code into container images, pushes these images to the Docker registry, and deploys them to the Kubernetes cluster.
- Skaffold synchronizes files in the repository with the working directory in the container.
- It automatically validates images with a container-structure-test.
- It forwards ports.
- Skaffold reads the logs of the application running in the container.
- It helps in debugging applications written in Java, Node.js, Python, Go.
And now to the peculiarities:
- The Skaffold itself does not have cluster-side components, so you don’t need to configure Kubernetes to use it.
- Various pipelines for your application. Do you deploy code into local Minikube during development and then proceed to staging or production environment? Skaffold already includes matching profiles, custom configs, environment variables, and flags, which allow you to define different pipelines for the same application.
- CLI. Skaffold supports the command line interface only and is configured by the YAML file. There have been reports of attempts to create an experimental GUI, however it looks like there’s not much demand in having a GUI at the moment.
- Support for custom modules. Skaffold isn’t an independent all-in-one tool; it aims to leverage stand-alone plugins or already existing solutions for specific tasks.
Here is a brief illustration of the last point.
During the building stage, you can use:
docker buildlocally, or in the cluster via kaniko, or in the Google Cloud Build;- Bazel locally;
- Jib Maven and Jib Gradle locally or in the Google Cloud Build;
- Custom build scripts that are run locally. If you want to run another (more flexible, conventional, etc) solution for building, then you have to describe it in the script, so that Skaffold can use it (an example from the docs). This way, you can use any builder you like, however, make sure that it is callable via a script.
For testing, Skaffold uses previously mentioned container-structure-test.
To deploy applications, Skaffold supports:
- kubectl;
- Helm;
- kustomize.
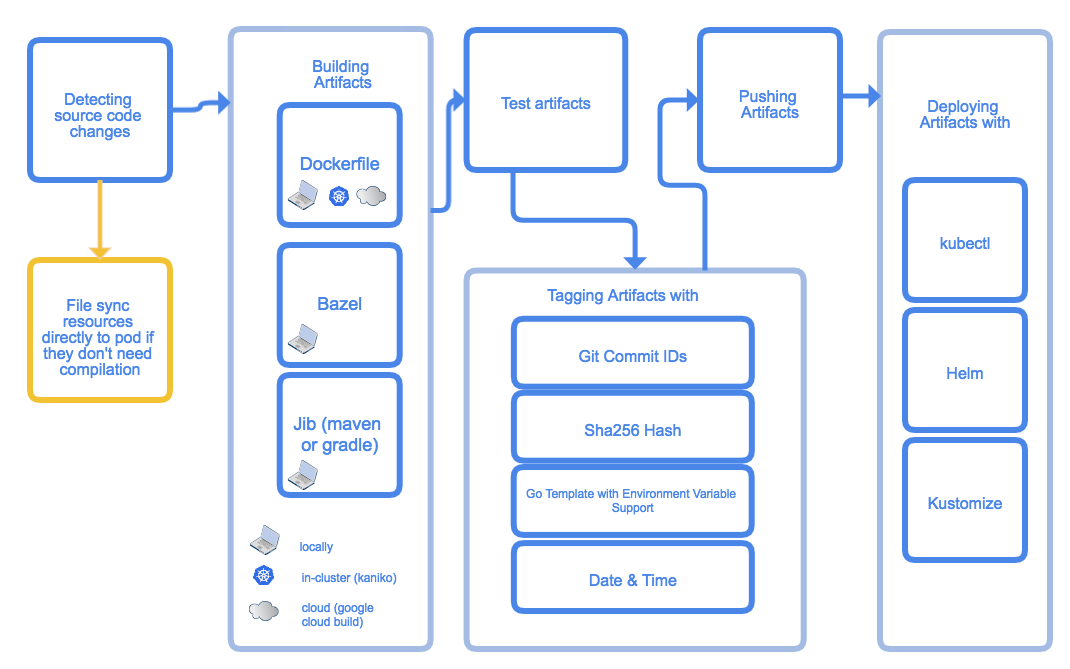
Thanks to this, you might say that Skaffold is a kind of a framework for implementing CI/CD. Here is an example of a workflow when using it (borrowed from the project documentation):

What is the general pattern of Skaffold’s workflow?
- The utility watches the directory with the source code for changes. If files are modified in some way, Skaffold synchronizes them with the application’s pod in the Kubernetes cluster, without rebuilding an image if possible. Otherwise, it builds a new image.
- Skaffold tests the new image with container-structure-test, tags it, and pushes to the Docker Registry.
- After that, the image is being deployed to the Kubernetes cluster.
- If we initiated the entire workflow with the
skaffold devcommand, then we start to receive application logs, and Skaffold will continue watching for changes to repeat all the steps again.
Practice. Let’s try Skaffold!
To demonstrate the process of using Skaffold, let’s take an official example from the repository of the project on GitHub. By the way, you may find many additional examples for various use cases there. All actions will be performed locally in Minikube. Installation is simple and takes several minutes. Kubectl is required to get started.
Let’s install Skaffold:
curl -Lo skaffold https://storage.googleapis.com/skaffold/releases/latest/skaffold-linux-amd64
chmod +x skaffold
sudo mv skaffold /usr/local/bin
skaffold version
v0.37.1
Clone Skaffold repository with the required examples:
git clone https://github.com/GoogleContainerTools/skaffold
cd skaffold/examples/microservices
I prefer an example with two pods, each of which contains a small Go application. The first application is the front-end (leeroy-web). It redirects requests to the second, back-end application (leeroy-app). Here is the tree:
~/skaffold/examples/microservices # tree
.
├── leeroy-app
│   ├── app.go
│   ├── Dockerfile
│   └── kubernetes
│       └── deployment.yaml
├── leeroy-web
│   ├── Dockerfile
│   ├── kubernetes
│   │   └── deployment.yaml
│   └── web.go
├── README.adoc
└── skaffold.yaml

4 directories, 8 files
leeroy-app and leeroy-web contain Go code and basic Dockerfiles for building this code locally:
~/skaffold/examples/microservices # cat leeroy-app/Dockerfile
FROM golang:1.12.9-alpine3.10 as builder
COPY app.go .
RUN go build -o /app .

FROM alpine:3.10
CMD ["./app"]
COPY --from=builder /app .
No need to list the code itself: you just need to know that leeroy-web receives requests and forwards them to leeroy-app. That’s why the Service for leeroy-app only is defined in the Deployment.yaml (for internal routing). Also, we will set portForward for leeroy-web’s pod to access the application quickly.
So here goes our skaffold.yaml:
~/skaffold/examples/microservices # cat skaffold.yaml
apiVersion: skaffold/v1beta13
kind: Config
build:
  artifacts:
    - image: leeroy-web
      context: ./leeroy-web/
    - image: leeroy-app
      context: ./leeroy-app/
deploy:
  kubectl:
    manifests:
      - ./leeroy-web/kubernetes/*
      - ./leeroy-app/kubernetes/*
portForward:
  - resourceType: deployment
    resourceName: leeroy-web
    port: 8080
    localPort: 9000
You can easily see definitions for all steps mentioned above. In addition to this config, there is a file with global settings, ~/.skaffold/config. You can edit it manually or via CLI, like this:
skaffold config set --global local-cluster trueThis command will set the local-cluster global variable to true. As a result, Skaffold will not try to push images to the remote registry. If you develop locally, you can use this command to keep images on the local machine.
Let’s get back to the skaffold.yaml:
- At the
buildstage we prescribe that Skaffold should build and store an image locally. After the process of building is completed for the first time, we will see the following:
// since Minikube creates cluster in a separate virtual machine,
// we have to get into it to list images
# minikube ssh
$ docker images
REPOSITORY      TAG                                                                IMAGE ID        CREATED        SIZE
leeroy-app      7d55a50803590b2ff62e47e6f240723451f3ef6f8c89aeb83b34e661aa287d2e   7d55a5080359    4 hours ago    13MB
leeroy-app      v0.37.1-171-g0270a0c-dirty                                         7d55a5080359    4 hours ago    13MB
leeroy-web      5063bfb29d984db1ff70661f17d6efcc5537f2bbe6aa6907004ad1ab38879681   5063bfb29d98    5 hours ago    13.1MB
leeroy-web      v0.37.1-171-g0270a0c-dirty                                         5063bfb29d98    5 hours ago    13.1MB
As you can see, Skaffold has automatically tagged images (by the way, it supports several tagging policies).
- The next field in the config file,
context: ./leeroy-app/, defines the context where the image is being built. - The
deploysection describes how images are deployed. We prefer to usekubectland set a file mask for the required manifests. PortForward: similar to the usual way of port forwarding withkubectl port-forward, we give Skaffold instructions to invoke this command. In this case, the local port 9000 is forwarded to 8080 in theleeroy-webDeployment.
Now the time has come to run skaffold dev. This command will start an ongoing “feedback loop”: it will build and deploy all the necessary components into the cluster, and then will report on the state of the pods, monitor for changes and update pods.
Here is the result of running skaffold dev --port-forward when rebuilding:
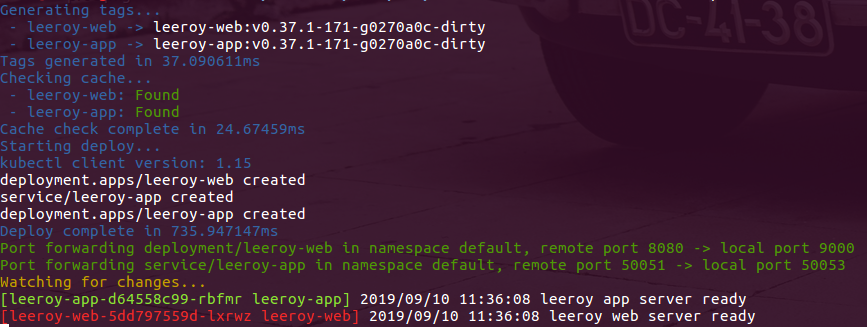
First of all, as you can see, Skaffold uses cache. Then it builds, deploys the application, and forwards ports. Since we have added --port-forward, Skaffold would forward the port to leeroy-web (as prescribed in the skaffold.yaml) and then do the same for leeroy-app by selecting a port at its own discretion (in this case, the nearest empty port). As the last step, Skaffold starts to show application logs.
Let’s check and see if everything works as planned:
~/skaffold/examples/microservices # kubectl get po
NAME                          READY   STATUS    RESTARTS   AGE
leeroy-app-6998dfcc95-2nxvf   1/1     Running   0          103s
leeroy-web-69f7d47c9d-5ff77   1/1     Running   0          103s
~/skaffold/examples/microservices # curl localhost:9000
leeroooooy app!!!
Now it is time to make some changes to leeroy-app/app.go — we’ll wait a few seconds, and then:
~/skaffold/examples/microservices # kubectl get po
NAME                          READY   STATUS    RESTARTS   AGE
leeroy-app-ffd79d986-l6nwp    1/1     Running   0          11s
leeroy-web-69f7d47c9d-5ff77   1/1     Running   0          4m59s
~/skaffold/examples/microservices # curl localhost:9000
leeroooooy Hi!!!
At the same time, the Skaffold’s output to the console has not changed except for one thing: it has deployed leeroy-app only, not both applications.
Need more practice?
It is worth mentioning that when creating a new project, you can bootstrap Skaffold configs with init command (a very convenient feature). Also, you can define several configs: one config for developing and another — to deploy to the stage environment via the run command (the same workflow as with dev except for, in this case, Skaffold doesn’t monitor for changes).
Katacoda has a guide with a more simplistic example. On the other hand, it provides a fully functional sandbox with Kubernetes, an application, and Skaffold preinstalled to play with. A great choice if you want to try the basics all on your own.
One of the possible use cases for Skaffold is development on a remote cluster. You may be uncomfortable with running Minikube on a local machine, and then having to deploy the application and wait to see if it is working properly. In this case, Skaffold addresses the problem perfectly: Reddit engineers can confirm that.
And in this Weaveworks publication, you can find an example of creating a pipeline for the production environment.
Note on differences between werf and Skaffold
As our regular readers already know, we are actively developing werf — our own tool for CI/CD. Should we say that these two instruments are very distinct in the implementation and objectives? The intent behind Skaffold is local development, while werf has its own internal methods for building and deploying applications (anywhere, including the production).
Skaffold doesn’t have internal mechanisms for building/deploying — it provides a kind of framework and uses available third-party tools for these tasks. To quote one of our werf developers, “Skaffold doesn’t bring anything new into these processes if we are not talking about local development specifically; rather, it is an alternative form of writing.”
Werf, on the other hand, was initially conceived as a full-fledged builder tool. As of today, it has a long list of features in this sense and we have added deploying functionality as well (it is based on Helm yet fully integrated into werf). Improving werf for local development needs is our next milestone of the project.
It’s also important to anticipate that, while werf has been in production for years, Skaffold has reached its first GA release these days only (Nov’19).
Conclusion
Skaffold is an excellent tool for creating pipelines to deploy applications in Kubernetes with developers’ needs in mind. With it, you can easily create a “short” pipeline that takes into account the necessities of developers, while it also allows to create more ambitious workflows. A good example of using Skaffold for CI/CD is this test project consisting of 10 microservices that tap into the capabilities of Kubernetes, gRPC, Istio, and OpenCensus Tracing.
Currently, Skaffold has about 8500 stars on GitHub. It is being developed by Google, is a part of GoogleContainerTools and has recently reached its first GA version. In other words, there are strong reasons to believe that the project will grow and prosper.

Comments