 SRE as a Service
 DevOps as a Service
 Cloud & Kubernetes migration
 Infrastructure & CI/CD audit
 R&D and technology consulting
 Kubernetes support
 Solution for SaaS
 All services

While different Kubernetes platforms have the same technology base, due to the inherent challenges the specifics of component implementation bring about, switching between platforms can be tricky. This article demonstrates how to migrate an application from OpenShift to a vanilla Kubernetes cluster. Then, a table comparing OpenShift and Kubernetes primitives will follow at the end with information as to which primitives must be replaced and which do not.
NB. I won’t cover any OpenShift disadvantages or reasons why somebody would consider changing this platform. For me, as an engineer, the fact we’ve seen such customers is enough to justify this possible migration.
Initial OpenShift setup
The OpenShift template below defines everything you need to run a basic web service. This is what we’re going to move:
apiVersion: template.openshift.io/v1
kind: Template
labels:
  nginx: master
metadata:
  annotations:
    description: example-template
    iconClass: icon-nginx
    tags: web,example
  name: web-app-example
objects:
- apiVersion: apps/v1
  kind: Deployment
  metadata:
    name: ${NAME}
  spec:
    replicas: ${{REPLICAS}}
    revisionHistoryLimit: 3
    selector:
      matchLabels:
        app: ${NAME}
    template:
      metadata:
        labels:
          app: ${NAME}
      spec:
        containers:
        - image: camunda/camunda-bpm-platform:run-7.15.0
          imagePullPolicy: Always
          name: camunda
          ports:
          - containerPort: 8080
            name: http
            protocol: TCP
          resources:
            limits:
              memory: ${BACK_MEMORY}
            requests:
              cpu: ${BACK_CPU}
              memory: ${BACK_MEMORY}
        - command:
          - /usr/sbin/nginx
          - -g
          - daemon off;
          image: nginx:stable-alpine
          imagePullPolicy: Always
          lifecycle:
            preStop:
              exec:
                command:
                - /bin/bash
                - -c
                - sleep 5; kill -QUIT 1
          name: nginx
          ports:
          - containerPort: 9000
            name: http
            protocol: TCP
          resources:
            limits:
              memory: ${FRONT_MEMORY}
            requests:
              cpu: ${FRONT_CPU}
              memory: ${FRONT_MEMORY}
          volumeMounts:
          - mountPath: /etc/nginx/nginx.conf
            name: configs
            subPath: nginx.conf
        volumes:
        - configMap:
            name: ${NAME}-config
          name: configs
- apiVersion: v1
  kind: Service
  metadata:
    annotations:
      description: Exposes and load balances the application pods
    name: ${NAME}-service
  spec:
    ports:
    - name: http
      port: 9000
      targetPort: 9000
    selector:
      app: ${NAME}
- apiVersion: v1
  kind: ConfigMap
  metadata:
    name: ${NAME}-config
  data:
    nginx.conf: |
      user nginx;
      worker_processes 1;
      pid /run/nginx.pid;

      events {
        worker_connections 1024;
      }

      http {
        include /etc/nginx/mime.types;
        default_type application/octet-stream;

        upstream backend {
          server 127.0.0.1:8080 fail_timeout=0;
        }

        server {
          listen 9000;
          server_name _;

          root /www;

          client_max_body_size 100M;
          keepalive_timeout 10s;

          location / {
            proxy_set_header X-Forwarded-For $proxy_add_x_forwarded_for;
            proxy_set_header X-Real-IP $remote_addr;
            proxy_set_header X-Forwarded-Proto $scheme;
            proxy_set_header Host $http_host;
            proxy_redirect off;

            proxy_pass http://backend;
          }
        }
      }

- apiVersion: route.openshift.io/v1
  kind: Route
  metadata:
    name: ${NAME}-route
  spec:
    host: ${DOMAIN}.apps-crc.testing
    port:
      targetPort: http
    to:
      kind: Service
      name: ${NAME}-service
      weight: 100
    wildcardPolicy: None
parameters:
- description: Name for application
  from: '[A-Z]{8}'
  generate: expression
  name: NAME
- description: Domain for application
  from: '[A-Z]{8}'
  generate: expression
  name: DOMAIN
- description: Number of replicas
  from: '[0-9]{1}'
  generate: expression
  name: REPLICAS
- description: Memory request and limit for frontend container
  from: '[A-Z0-9]{4}'
  generate: expression
  name: FRONT_MEMORY
- description: CPU request for frontend container
  from: '[A-Z0-9]{3}'
  generate: expression
  name: FRONT_CPU
- description: Memory request and limit for backend container
  from: '[A-Z0-9]{4}'
  generate: expression
  name: BACK_MEMORY
- description: CPU request for backend container
  from: '[A-Z0-9]{3}'
  generate: expression
  name: BACK_CPU
Let’s take a closer look at it. The template includes the following details:
- The application’s Deployment: we use NGINX as the frontend and a stateless demo version of Camunda as the backend.
- The ConfigMap with the NGINX configuration is mounted into a container.
- The Route resource forwards traffic to the target domain from outside the cluster.
- The Service resource directs traffic to the application Pods.
On top of that, the OpenShift template allows you to customize a number of settings. The parameter values used in the template, stored in the values.env file, are as follows:
NAME=example-application
DOMAIN=example
REPLICAS=1
FRONT_MEMORY=128Mi
FRONT_CPU=50m
BACK_MEMORY=512Mi
BACK_CPU=50m
These get inserted into the parameters section.
Migrating to the Kubernetes cluster
Preparing the K8s resources
To switch from OpenShift to a “pure” Kubernetes cluster, you will have to:
- Move all the entity descriptions from the template to separate YAML files since the template is an OpenShift-specific object.
- Move the parameters from
values.envtovalues.yaml. - Replace the Route object with Ingress.
The Deployment, Service, and ConfigMap objects are the easiest to deal with — they only require minor modifications. All you have to do is create a separate definition file for each object. First, let’s define the application in the app.yaml file:
apiVersion: apps/v1
kind: Deployment
metadata:
  name: {{ .Chart.Name }}
spec:
  replicas: {{ .Values.app.replicas }}
  revisionHistoryLimit: 3
  selector:
    matchLabels:
      app: {{ .Chart.Name }}
  template:
    metadata:
      labels:
        app: {{ .Chart.Name }}
    spec:
      containers:
      - image: camunda/camunda-bpm-platform:run-7.15.0
        imagePullPolicy: Always
        name: camunda
        ports:
        - containerPort: 8080
          name: http
          protocol: TCP
        resources:
          limits:
            memory: {{ .Values.app.backend.memory }}
          requests:
            cpu: {{ .Values.app.backend.cpu }}
            memory: {{ .Values.app.backend.memory }}
      - command:
        - /usr/sbin/nginx
        - -g
        - daemon off;
        image: nginx:stable-alpine
        imagePullPolicy: Always
        lifecycle:
          preStop:
            exec:
              command:
              - /bin/bash
              - -c
              - sleep 5; kill -QUIT 1
        name: nginx
        ports:
        - containerPort: 9000
          name: http
          protocol: TCP
        resources:
          limits:
            memory: {{ .Values.app.frontend.memory }}
          requests:
            cpu: {{ .Values.app.frontend.cpu }}
            memory: {{ .Values.app.frontend.memory }}
        volumeMounts:
        - mountPath: /etc/nginx/nginx.conf
          name: configs
          subPath: nginx.conf
      volumes:
      - configMap:
          name: {{ .Chart.Name }}-config
        name: configs
Next, move the Service definition to service.yaml:
apiVersion: v1
kind: Service
metadata:
  annotations:
    description: Exposes and load balances the application pods
  name: {{ .Chart.Name }}
spec:
  ports:
  - name: http
    port: 9000
    targetPort: 9000
  selector:
    app: {{ .Chart.Name }}
… and the ConfigMap definition to configmap.yaml:
apiVersion: v1
kind: ConfigMap
metadata:
  name: {{ .Chart.Name }}-config
data:
  nginx.conf: |
    user nginx;
    worker_processes 1;
    pid /run/nginx.pid;

    events {
      worker_connections 1024;
    }

    http {
      include /etc/nginx/mime.types;
      default_type application/octet-stream;

      upstream backend {
        server 127.0.0.1:8080 fail_timeout=0;
      }

      server {
        listen 9000;
        server_name _;

        root /www;

        client_max_body_size 100M;
        keepalive_timeout 10s;

        location / {
          proxy_set_header X-Forwarded-For $proxy_add_x_forwarded_for;
          proxy_set_header X-Real-IP $remote_addr;
          proxy_set_header X-Forwarded-Proto $scheme;
          proxy_set_header Host $http_host;
          proxy_redirect off;

          proxy_pass http://backend;
        }
      }
    }
Now, replace values.env with values.yaml:
app:
  replicas: 1
  host: example.kubernetes.testing
  backend:
    memory: 512Mi
    cpu: 50m
  frontend:
    memory: 128Mi
    cpu: 50m
The Route is also an OpenShift-specific object. It can be replaced with a regular Ingress object. To do this, create an ingress.yaml file and fill it with the following definition:
apiVersion: networking.k8s.io/v1
kind: Ingress
metadata:
  annotations:
    kubernetes.io/ingress.class: nginx
  name: {{ .Chart.Name }}
spec:
  rules:
  - host: {{ .Values.app.host }}
    http:
      paths:
      - path: /
        pathType: Prefix
        backend:
          service:
            name: {{ .Chart.Name }}
            port:
              number: 9000
At this point, we are done with the preparations! The created Helm chart is ready to be deployed to a vanilla Kubernetes cluster.
Deploying the chart with our app
We will use werf to deploy the resources. However, it’s not a requirement at all. Since we’ve prepared a regular Helm chart, it is compatible with any tools you prefer.
Start the deployment using the werf converge command:
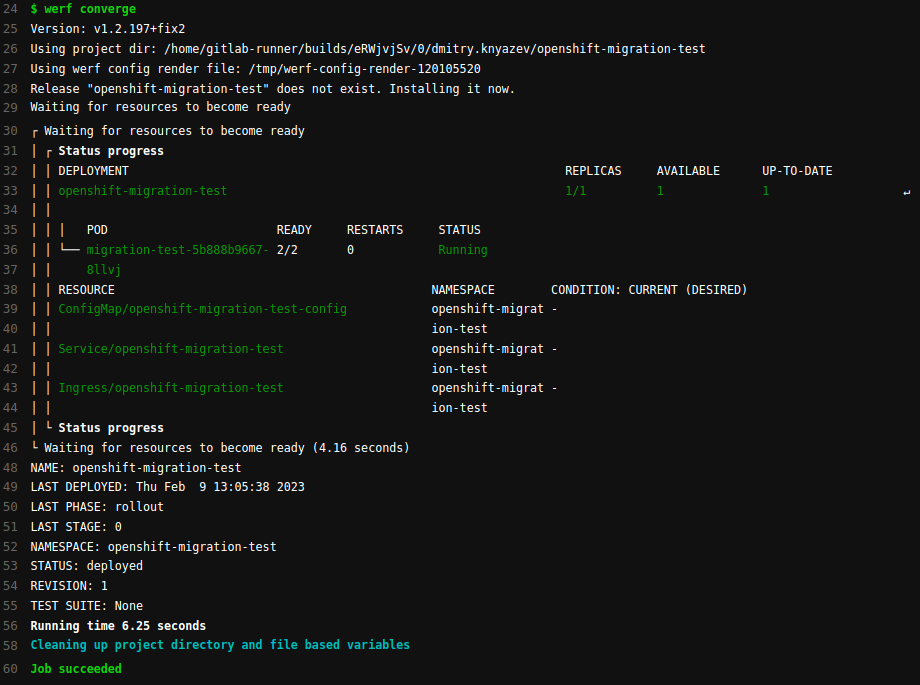
Check that all the resources are indeed in the cluster:
$ kubectl -n openshift-migration-test get deployment
NAME                        READY   UP-TO-DATE   AVAILABLE   AGE
openshift-migration-test    1/1     1            1           19m
$ kubectl -n openshift-migration-test get service
NAME                        TYPE        CLUSTER-IP     EXTERNAL-IP   PORT(S)    AGE
openshift-migration-test    ClusterIP   10.222.129.7   <none>        9000/TCP   19m
$ kubectl -n openshift-migration-test get ingress
NAME                        CLASS    HOSTS                        ADDRESS         PORTS   AGE
openshift-migration-test    <none>   example.kubernetes.testing   95.217.68.210   80      19m
$
Finally, make sure that the application works correctly and is accessible to the users:

Notes on DeploymentConfig
The DeploymentConfig resource is widely used in OpenShift, so it warrants being covered in greater detail. It is a modification of the regular Deployment resource, which is extended by the ImageStream and BuildConfig resources. The latters are designed to build images and deploy the application to the cluster.
Note that in vanilla Kubernetes, no resource matches DeploymentConfig. So you’ll have to use additional tools to do what the DeploymentConfig + ImageStream + BuildConfig bundle does.
That is, DeploymentConfig can be replaced with Deployment in Kubernetes. At the same time, unsupported features can be implemented by such third-party tools as a CI system, an image-building tool, and an external registry to store those images in.
Below is a rough list of steps required to convert DeploymentConfig to Deployment:
- Replace
apiVersion: apps.openshift.io/v1withapiVersion: apps/v1. - Replace
kind: DeploymentConfigwithkind: Deployment. - Replace
spec.selectorsfromselector: name: ...toselector: matchLabels: name: .... - Make sure that the
spec.template.spec.containers.imagesection is defined for each container. - Delete the
spec.triggers,spec.strategy, andspec.testsections.
Note that these instructions are not universal. Each case is unique and features its own intricacies. Please refer to the official DeploymentConfig documentation for greater detail.
OpenShift migration cheatsheet
Moving an application from OpenShift to vanilla Kubernetes requires: a) breaking templates up into separate YAML resources and b) replacing a number of OpenShift-specific objects with their native K8s counterparts.
The summary table below shows which OpenShift resources match those of Kubernetes. It will help you with your migration:
| OpenShift | Kubernetes |
| Template | Replace with a Helm chart |
| DeploymentConfig | Replace with Deployment (while keeping in mind the peculiarities related to ImageStream and BuildConfig) |
| Route | Replace with Ingress |
| Deployment/StatefulSet/DaemonSet | No changes are necessary (all you do is substitute the parameters) |
| Service/ConfigMap, etc. | No changes are necessary (all you do is substitute the parameters) |
Conclusion
I used a basic yet real application to illustrate the main issues and challenges you’ll go through while performing a migration. While it provides general points to consider, each case is unique and might come with its extra peculiarities.
Another important note is that this guide helps to move applications from OpenShift not just to vanilla Kubernetes itself but to other platforms as well. For example, we successfully used these instructions (with no other modifications required) to migrate apps to the Deckhouse Platform. By the way, since we have extensive experience migrating our customers’ workloads from OpenShift, Rancher, and other solutions, feel free to contact us if you need any help with similar tasks!

Thanks for this post!