
This article comprises an overview report of the most common token exchange method in OpenID Connect flow: grants. We promise it will not be a tiresome journey, so take a comfortable seat and buckle up.
Interlude
Every now and then in our ordinary lives, we find ourselves in situations where we need to identify ourselves, e.g., paying bills, buying boarding passes, or even going to nightclubs. That is not a problem because literally, everyone has a passport issued by their own country’s identification and passport services. Thus, one could say that your government has authenticated you.
A token is an analog of a passport on the internet. It contains:
- Information about a user;
- The signature of the issuer;
- An expiration date.
That is where the OpenID Connect (OIDC) comes into play. Based on the OAuth2 specification, this protocol gives you a passport with all the necessary signatures for internet communication, which can be validated by other cooperating services (also known as relying parties, RPs). Tokens are issued and signed by identity providers (IdPs), an analog of identification and passport services.
In conclusion, we have a relying party that asks for your token and identity provider, which issues tokens. So then, what comes next? How do you obtain a token and where do you go to get one?
Grants
There are many ways to interact with an IdP in order to obtain a token — briefly referred to as grants. Most of them are common and widespread. Some stand out for their particular IdPs.
Information about supported grants is public and available upon requesting the discovery endpoint of an IdP:
curl 'https://your-idp.com/.well-known/openid-configuration' \
  | jq .grant_types_supported

["authorization_code","refresh_token","urn:ietf:params:oauth:grant-type:device_code"]
Let’s dive into the features, pros, and cons of the most popular OIDC grants.
1. Authorization Code Grant
Authorization Code Grant is the asset of the OIDC protocol and the reason this protocol was invented in the first place. It involves all three participants: a user, an IdP, and an RP.
In order to ignite the process, a user goes to an IdP’s authorization endpoint and exchanges the credentials for a … drawing of a token (or, as we call it, the code) instead of a token. The user takes the code and goes straight to the RP. After the code is obtained, the RP requests a token endpoint of the IdP to acquire the token

Pros:
- Besides the IdP, no one sees the user’s credentials;
- The RP gets the token directly from the IdP, which is trustworthy.
Cons:
- The flow requires a browser interaction, which is impossible to use for machine-to-machine communication;
- Criminals can still steal code;
- Demanding three-way connectivity between all participants of the flow: the User, RP, and IdP.
2. Proof Key for Code Exchange (PKCE)
PKCE is an improvement for the auth code flow to prevent the possibility of the code being stolen. The weakness of the auth code flow is when the user goes with the code back to the RP. How do we know that this is the same old RP? A fraudster could distract it and assume its place just like the wolf disguised as the grandmother in the Little Red Riding Hood story. One should trust no one.
The idea of the proof key is not particularly complicated. The user needs to tell the RP how to decrypt a code and then suggest to the IdP how to encrypt the code. That’s it!

You can get supported code challenge methods by requesting a discovery endpoint:
curl 'https://your-idp.com/.well-known/openid-configuration' \
  | jq .code_challenge_methods_supported

["S256","plain"]
3. Implicit Grant
The grant was designed for authentication used in single-page applications (SPAs). It is similar to the authorization code grant. The only difference is that users receive an actual token as a GET parameter on redirecting rather than a code (a drawing of a key, remember?).

Pros:
- A SPA does not need to make a POST request to an IdP (which can be forbidden by CORS).
Cons:
- Frauds can collect all tokens from your browser history;
- There is no way to issue a refresh token.
The convenience of this flow is not so essential, as it leads to an enormous security hole being created. Consider avoiding the Implicit Grant in favor of the Authorization Code Grant.
4. Password Credentials Grant
A user can lend their credentials to the RP to receive the token on their behalf. Telling your secrets to anyone is not a good idea, though. This grant can be used if you are a hundred percent confident in the RP. However, as we mentioned earlier, no one deserves total trust.

Password Credentials Grant only exists because sometimes it is ok to trade off security for convenience, yet it is still not recommended to use it. Please think twice before adopting it.
Pros:
- It can be used to authenticate CLI applications;
- It can be used for machine-to-machine communication;
- Good for automation, as it requires only a single request on the user’s part.
Cons:
- The credentials can be leaked;
- It encourages users to send their credentials to places other than the IdP.
5. Client Credentials Grant
This grant allows you to obtain a token representing the RP itself. It is like a passport for the passport issuing agency.
There are no user interactions. With this token, it is possible to give permissions directly to the RP, e.g., to invoke additional API calls to the IdP.

Pros:
- An interesting opportunity.
Cons:
- This grant is not about users, so let’s move on.
6. Refresh Token Grant
Our passports are valid for years but imagine a passport that expires in 5 or 10 minutes. It sounds like a living hell to sit in queues to renew it every time we want to buy flight tickets.
Airways want to get the most up-to-date photo and data from us. That’s why the expiration period is so short. There should be a simple refreshing procedure to help users preserve their sanity. That is, a way to say: “Hey! It’s me again. Could you please email me a new passport?”
This method exists, and it is called the “Refresh Token”. This unique token can be exchanged to gain a new identification token.

Pros:
- Convenient;
- Refresh Token is a long-duration token that will be sent only to the IdP, which is the most secure way to obtain the token.
Cons:
- It can only be used to extend token life;
- Access to the IdP is required.
7. Device Authorization Grant
“Ok, but what if I want to get a passport for my refrigerator, microwave heater, or vacuum cleaner?” Yes! The OIDC protocol is widespread on the Internet of Things. The only question is how to get the token if a refrigerator doesn’t have a browser or terminal.
First off, a device needs to know a URL to initiate authentication. That is available by requesting the discovery endpoint of the IdP:
curl 'https://your-idp.com/.well-known/openid-configuration' \
  | jq .device_authorization_endpoint

https://your-idp.com/oauth2/v1/device/authorize
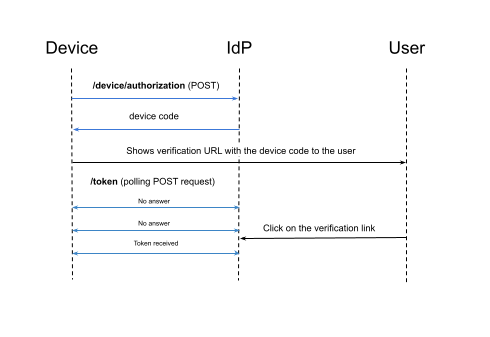
After requesting the device authorization endpoint, our IdP will generate a device code along with a verification link to approve the device’s authentication. The IdP will return the link to the device.
At this moment, the device performs two simultaneous actions:
- It starts continuously sending a request with the device’s code to the token endpoint to exchange it for a token;
- It shows the user a verification link, e.g., on the device’s display.
After the user clicks on the verification link, the device will receive the token.
Pros:
- Yeah! We can authenticate devices. Hooray!
Cons:
- From now on, you have to buy exclusively expensive home appliances.
Conclusion
This article briefly overviewed the most common OIDC grants and when to use them.
TLDR: in 99% of cases, you do not need to use anything other than the authorization code grant, and it’s better with the PKCE and refresh tokens.
Due to the OIDC protocol’s extensibility, users can invent their own grants and declare their support through the discovery endpoint. I consciously avoided describing the CIBA grant because it is a fascinating, promising, yet pretty raw grant, which is not implemented by the significant OIDC providers, such as Okta or Auth0.
I hope this article has helped you better understand the authentication process in general and the procedure for obtaining a token in particular. Cheers!

Comments