Helm Dashboard renders managing Helm releases in Kubernetes much easier by providing a graphical user interface, which is what many developers might expect. It can be used to create, deploy, and update releases for applications in Kubernetes and keep track of their status.
This article will explore the features and advantages Helm Dashboard provides and explain how it can be used to facilitate Kubernetes application management. We will be covering its basic functions and user interface, as well as show some practical examples.
What is Helm Dashboard?
Helm Dashboard is an Open Source GUI for Helm that was developed by Komodor and described as “the missing UI for Helm” by its authors. As you probably know, Helm is some kind of Kubernetes package manager. It simplifies installing applications in Kubernetes (via packages called Helm charts) and managing their versions. When your Helm chart is installed, its instance running in your Kubernetes cluster is called a Helm release.
Helm Dashboard provides you with a web UI to explore and manage (e.g., modify or delete) these releases. This project was born in August 2022 and announced as generally available with its v1.0.0 in February 2023. Currently (as of December 2023), its latest version is v1.3.3, released in June 2023, and its GitHub repository boasts almost 4500 stars and over 40 contributors. It is written in TypeScript (Node.js) and Go.
Installing Helm Dashboard
The official documentation in the project’s repository proposes several ways that Helm Dashboard can be installed. You can:
- Download the archive with the executable file pre-built.
- Install it as a Helm plugin.
- Use a chart to install it in a K8s cluster (this will create an Ingress resource as well).
- Build the executable file from the source code yourself.
In this article, we’re going to stick to the second option — Helm plugin. To install the plugin, you need to have Helm v3.4.0+ and execute the following command:
helm plugin install https://github.com/komodorio/helm-dashboard.gitNote that plugin needs the configuration file called kubeconfig to access the Kubernetes cluster (the K8s documentation covers this topic in detail).
To run the plugin, type in your terminal:
helm dashboardThis will open up a web UI in your browser showing the Helm releases’ overview page by default.
Exploring Helm Dashboard features
Displayed at the top of the page are the Installed and Repository tabs. These are the main tabs we will be working with. Let’s take a look at them in greater detail.
Managing installed Helm releases
The Installed tab allows you to see your installed releases and filter them by selecting specific Kubernetes clusters and required namespaces:
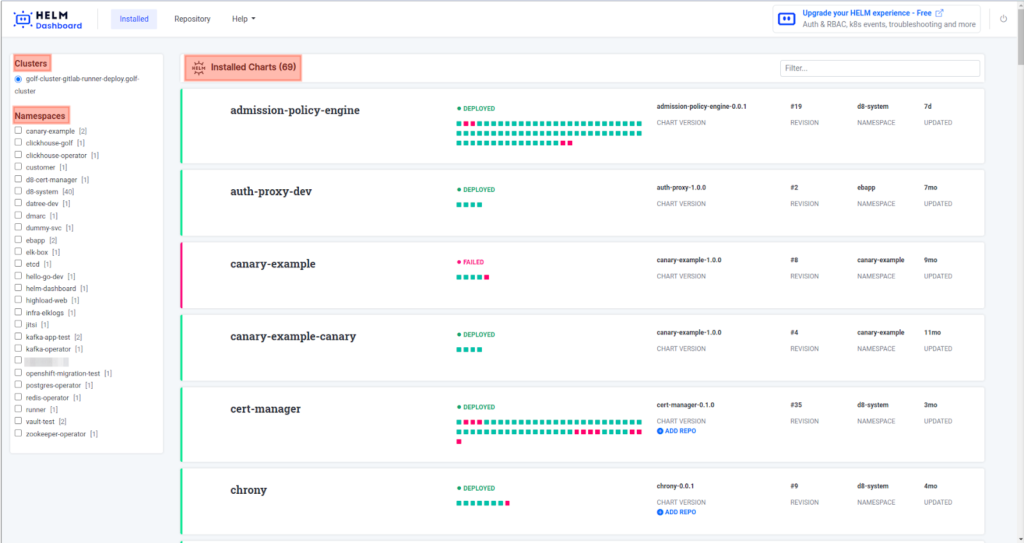
Click on any release to view detailed information on it.
If the release is listed as failed, an error message will display. It will state the reasons why the release has failed to install:

If the release installation went successfully, the dashboard will display the list of related Kubernetes resources instead.
Let’s take the zookeeper-operator-dev release as an example:
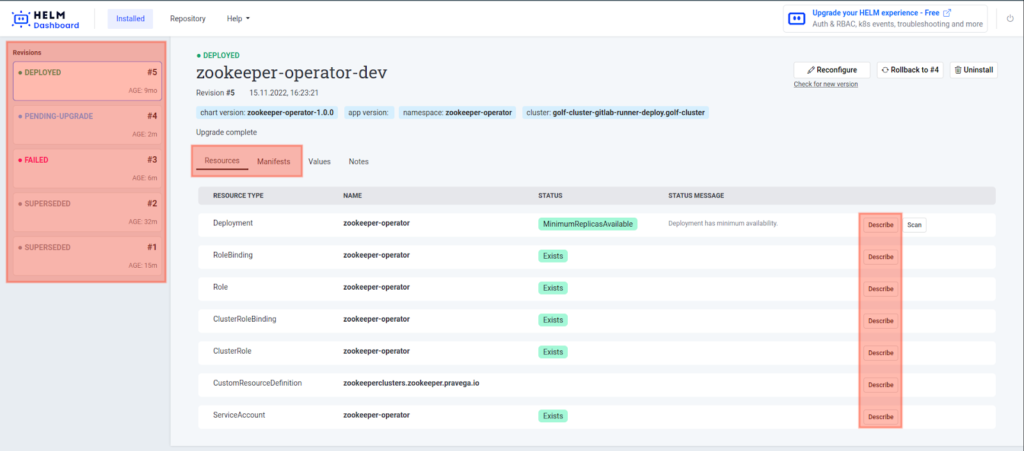
Shown on the left side of the page, Revisions are the states of the releases that the system has found in the cluster.
Our main focus will be set on the Resources and Manifests tabs in the main section of the page.
Releases resources
The Resources tab lists the resources in the release. There is a Describe button for each resource. Click on one to view a resource summary:
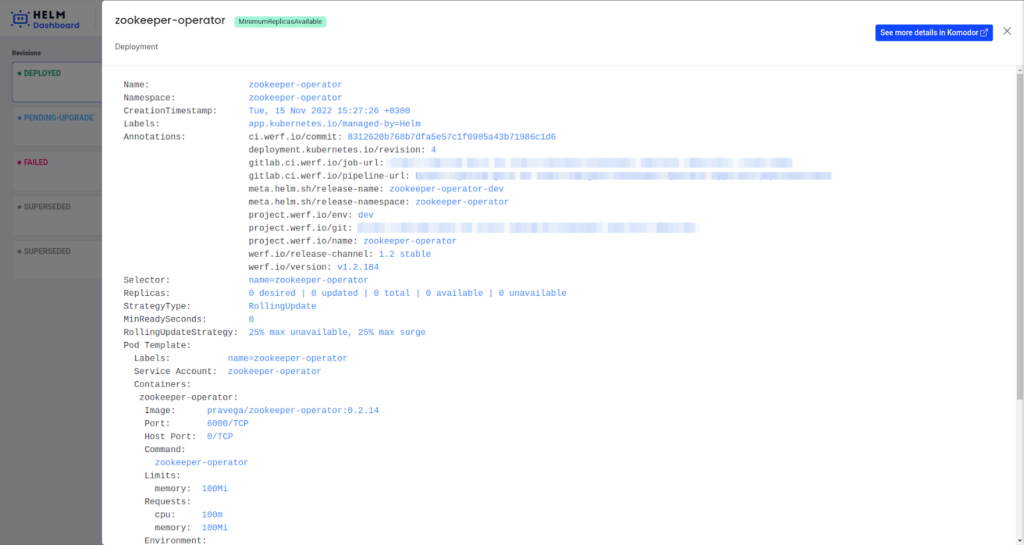
As you can see, the resource description is a regular kubectl describe output.
In some cases, there may be a Scan button next to the Describe button as well:

It becomes available in the event that Trivy is installed. This tool scans containers and detects vulnerabilities as well as potential threats.
Click the Scan button to commence scanning the resource. It will conclude with a report such as the following:
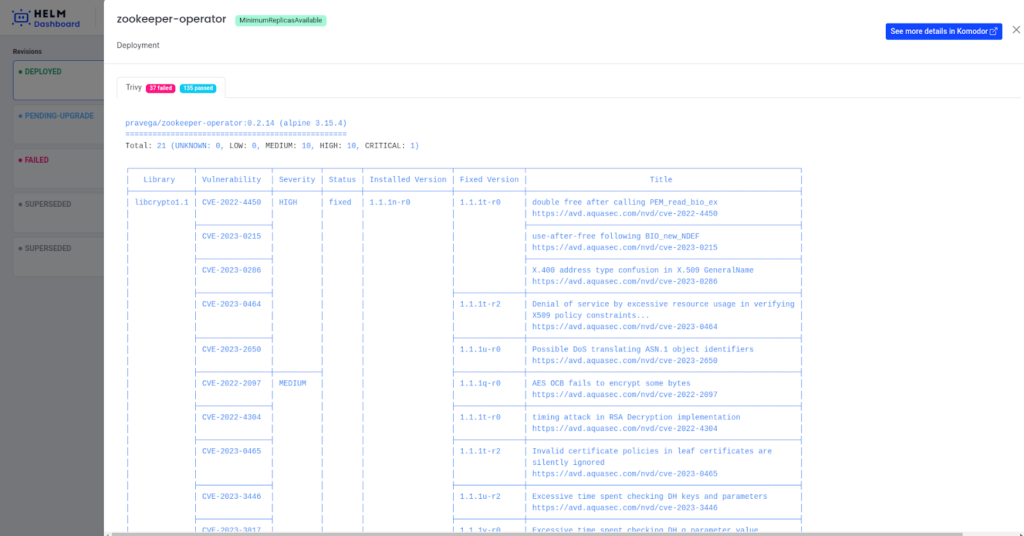
Releases manifests
The Manifests tab shows the resource manifests in the release. You can select any manifest from among those existing in the cluster:
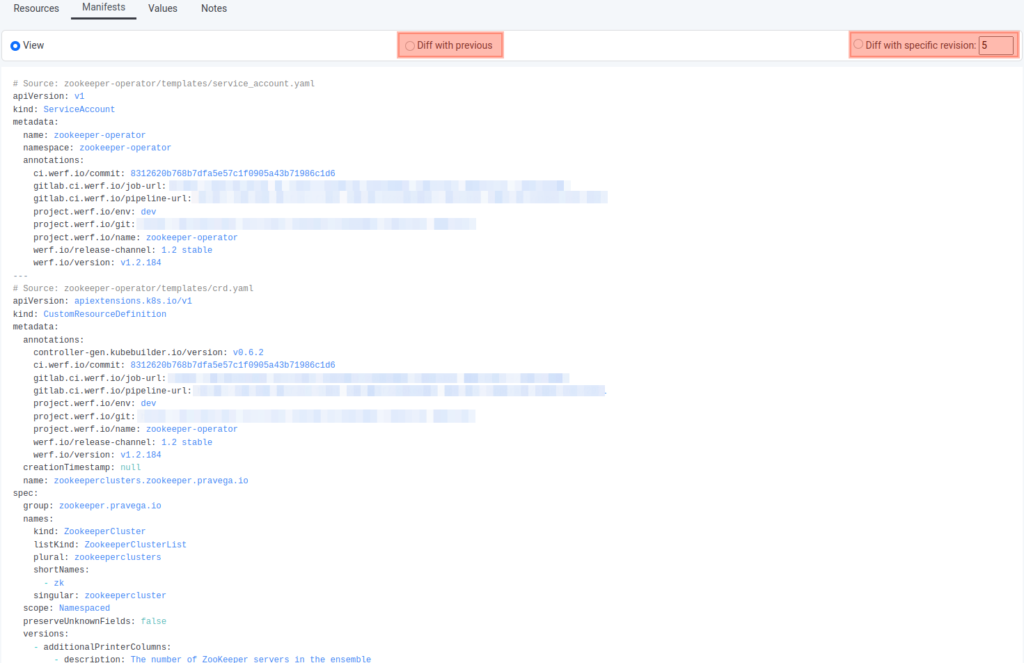
The window that subsequently appears will have two tabs:
- Diff with previous shows the difference between the current and previous releases.
- Diff with specific revision shows the difference between the current and particular releases.
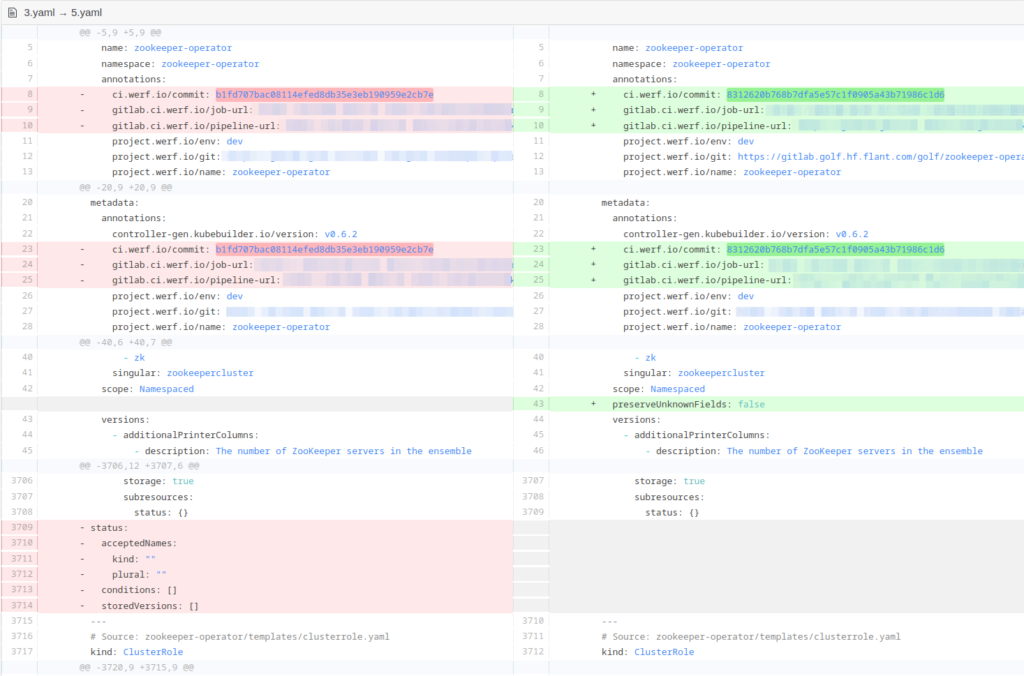
For example, here’s the difference between the current one and version 3, which failed to deploy:
Releases actions
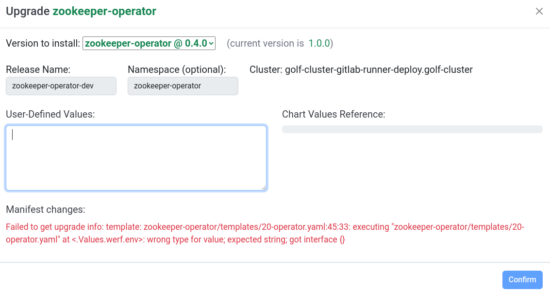
You can upgrade, roll back, or remove any release from the cluster. The Reconfigure, Rollback, and Uninstall buttons at the Installed page do just that:

Here’s a screenshot of an upgrade window:
Managing Helm repositories
The Repository window allows you to manage the locally installed Helm repositories. The left panel, meanwhile, displays the list of your repositories:
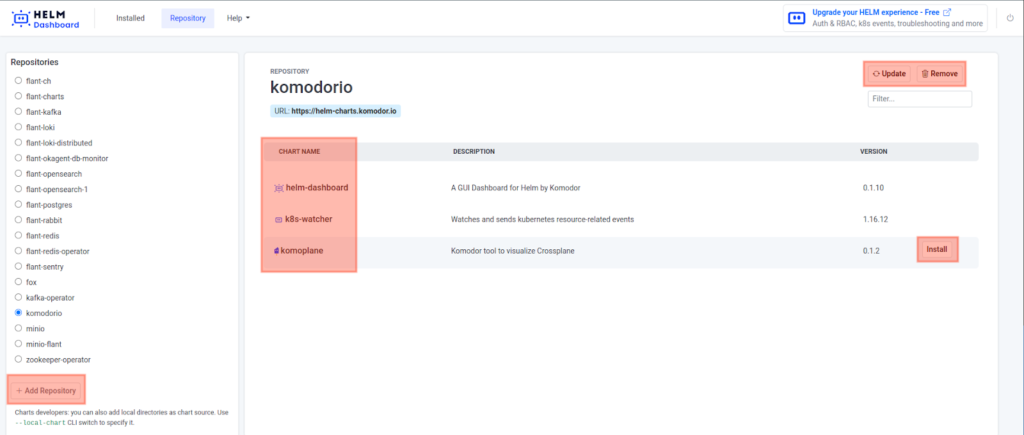
You can select a repository and explore the Helm charts that come with it. Other things you can do are:
- add a repository;
- update a repository;
- remove a repository.
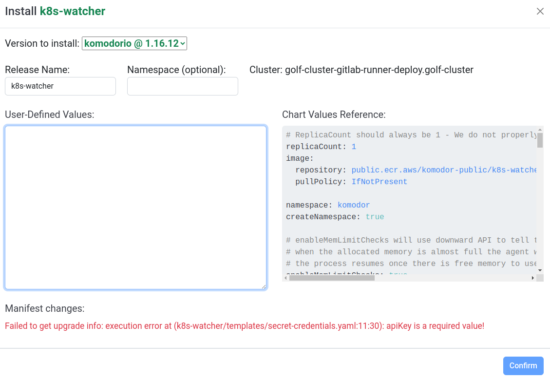
The Helm charts available in the repository can be installed into your Kubernetes cluster. But first, you have to fill in chart values. To do so, click the Install button next to the chart name. That will result in the following window popping up:
Helm Dashboard advantages and subtleties
Now that we have gone through main Helm Dashboard’s features, it’s time to point out those among them I liked the most:
- Helm Dashboard can be installed locally or in a cluster using a chart.
- You can view the Helm charts installed in the cluster and examine their release history.
- The diff feature shows the differences between the release versions.
- You can roll back the Helm release or update it.
- When installed locally, you can browse releases from multiple clusters.
- Helm Dashboard can be integrated with vulnerability scanners.
- The UI is intuitive and pleasant to use.
As for the peculiarities of Helm Dashboard, it is worth noting that its UI affects the Kubernetes API server. When the tool is started, the service requests release secrets, causing the CPU’s utilization to increase. For example, this is what the cluster state looks like before Helm Dashboard requests release secrets:
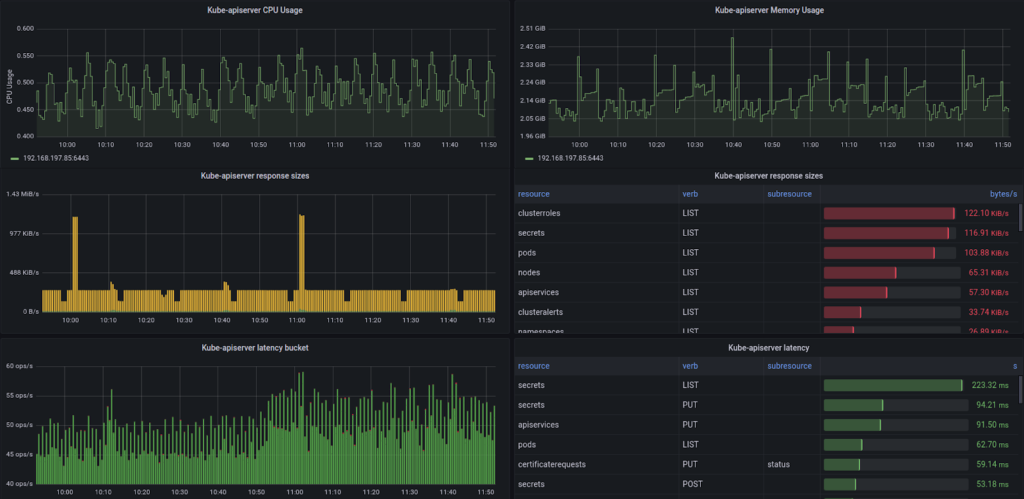
Here, you can see the typical cluster state before running Helm Dashboard: the CPU usage, what K8s resources are being requested, and how often.
And here is the cluster state after Helm Dashboard initiates requesting release secrets:
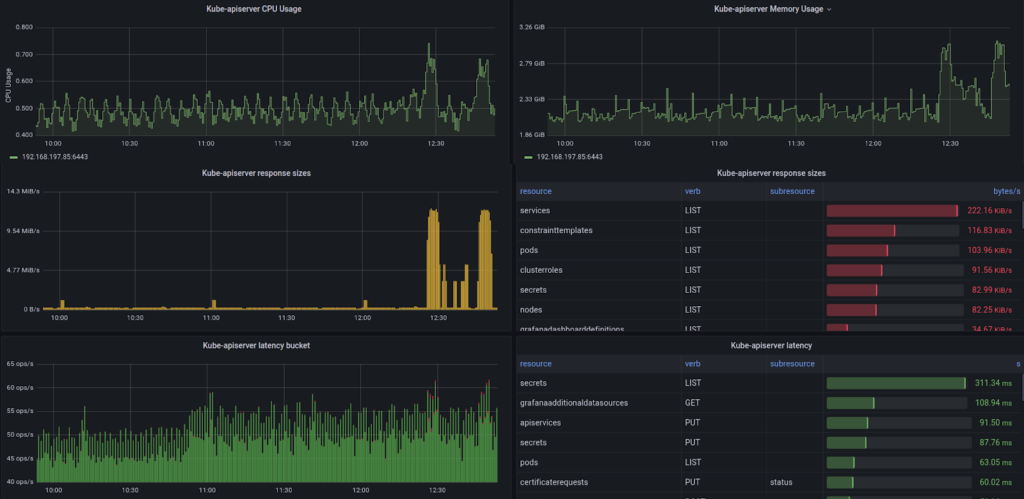
As we can see from these graphs, the CPU utilization has increased as secret resources are being actively retrieved.
Conclusion
I believe Helm Dashboard to be a convenient web UI for viewing and managing Helm releases in Kubernetes. I am particularly fond of the diff function, which allows you to compare releases against each other.
This tool’s minimalistic, comfortable, and neat interface leaves a pleasant impression. It will serve as a godsend for a development team when working with test clusters and help them figure out what went wrong and fix it quickly.



Comments