In one of the projects, I found myself faced with a classic problem: the application load on the relational database was extremely heavy due to the high RPS (requests per second) rate. However, the actual percentage of unique data retrieved from the database was relatively low. In addition, the slow database response forced the application to establish new connections, further increasing the load and causing a snowball effect.
The solution to this problem was obvious: data caching. I used memcached as the caching system. It took the brunt of the data retrieval requests. However, there were some sticking points when I tried to migrate the application to Kubernetes.
The problem
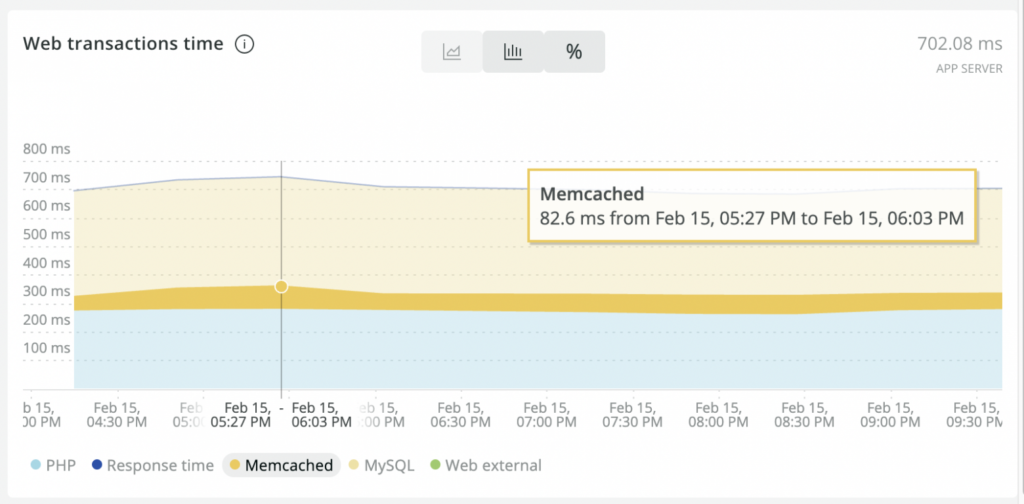
The application benefited from migrating to K8s due to the ease of scaling and transparency of the chosen caching scheme. However, the application’s average response time increased. Performance analysis conducted using the New Relic platform revealed that memcached transaction time increased significantly following the migration.
Upon investigating the causes of the increased delays, I realized that they were caused solely by network latencies. The thing is that before the migration, the application and memcached were running on the same physical node, while in a K8s cluster, the application and memcached Pods were usually running on different nodes. In cases such as these, network latencies are inevitable.
The solution
Disclaimer. The technique below has been tested in a production cluster with 10 memcached instances. Note that I didn’t try it on any larger deployments.
Apparently, memcached must be run as a DaemonSet on the same nodes which the application is running on. That means you have to configure node affinity. Here is a production-like listing to make things more interesting (with probes and requests/limits):
apiVersion: apps/v1
kind: DaemonSet
metadata:
 name: mc
 labels:
   app: mc
spec:
 selector:
   matchLabels:
     app: mc
 template:
   metadata:
     labels:
       app: mc
   spec:
     affinity:
       nodeAffinity:
         requiredDuringSchedulingIgnoredDuringExecution:
           nodeSelectorTerms:
           - matchExpressions:
             - key: node-role.kubernetes.io/node
               operator: Exists
     containers:
     - name: memcached
       image: memcached:1.6.9
       command:
       - /bin/bash
       - -c
       - --
       - memcached --port=30213 --memory-limit=2048 -o modern v --conn-limit=4096 -u memcache
       ports:
       - name: mc-production
         containerPort: 30213
       livenessProbe:
         tcpSocket:
           port: mc-production
         initialDelaySeconds: 30
         timeoutSeconds: 5
       readinessProbe:
         tcpSocket:
           port: mc-production
         initialDelaySeconds: 5
         timeoutSeconds: 1
       resources:
         requests:
           cpu: 100m
           memory: 2560Mi
         limits:
           memory: 2560Mi
---
apiVersion: v1
kind: Service
metadata:
 name: mc
spec:
 selector:
   app: mc
 clusterIP: None
 publishNotReadyAddresses: true
 ports:
 - name: mc-production
   port: 30213
In my case, the application also required cache coherence. In other words, the data in all cache instances must be identical to the data in the database. The application features a mechanism for updating memcached data as well as updating cached data in the database. Consequently, we need a mechanism that propagates cache updates made by the application instance on one node to all the other nodes. To do so, we will use mcrouter – a memcached protocol router for scaling memcached deployments.
Adding mcrouter to the cluster
Mcrouter should also be run as a DaemonSet to speed up reading cache data. We can thus guarantee that mcrouter connects to the nearest memcached instance (i.e., running on the same node). The basic method is to run mcrouter as a sidecar container in the memcached Pods. In that case, mcrouter can connect to the nearest memcached instance at 127.0.0.1.
However, for the purposes of improving fault tolerance, it is better to put mcrouter into a separate DaemonSet while enabling hostNetwork for both memcached and mcrouter. This setup ensures that any problems with any memcached instance will not affect the cache availability for the application. At the same time, you can independently redeploy both memcached and mcrouter, thereby increasing the fault tolerance of the entire system during such operations.
Let’s add hostNetwork: true to the manifest to enable memcached to use hostNetwork.
Let’s also add to the memcached container an environment variable with the IP address of the host where the Pod is running:
       env:
       - name: HOST_IP
         valueFrom:
           fieldRef:
             fieldPath: status.hostIP
… while modifying the memcached launch command so that the port only listens to the internal cluster IP:
       command:
       - /bin/bash
       - -c
       - --
       - memcached --listen=$HOST_IP --port=30213 --memory-limit=2048 -o modern v --conn-limit=4096 -u memcache
Now do the same with mcrouter’s DaemonSet (its Pods must use hostNetwork as well):
apiVersion: apps/v1
kind: DaemonSet
metadata:
 name: mcrouter
 labels:
   app: mcrouter
spec:
 selector:
   matchLabels:
     app: mcrouter
 template:
   metadata:
     labels:
       app: mcrouter
   spec:
     affinity:
       nodeAffinity:
         requiredDuringSchedulingIgnoredDuringExecution:
           nodeSelectorTerms:
           - matchExpressions:
             - key: node-role.kubernetes.io/node
               operator: Exists
     hostNetwork: true
     imagePullSecrets:
     - name: "registrysecret"
     containers:
     - name: mcrouter
       image: {{ .Values.werf.image.mcrouter }}
       command:
       - /bin/bash
       - -c
       - --
       - mcrouter --listen-addresses=$HOST_IP --port=31213 --config-file=/mnt/config/config.json --stats-root=/mnt/config/
       volumeMounts:
       - name: config
         mountPath: /mnt/config
       ports:
       - name: mcr-production
         containerPort: 30213
       livenessProbe:
         tcpSocket:
           port: mcr-production
         initialDelaySeconds: 30
         timeoutSeconds: 5
       readinessProbe:
         tcpSocket:
           port: mcr-production
         initialDelaySeconds: 5
         timeoutSeconds: 1
       resources:
         requests:
           cpu: 300m
           memory: 100Mi
         limits:
           memory: 100Mi
       env:
       - name: HOST_IP
         valueFrom:
           fieldRef:
             fieldPath: status.hostIP
     volumes:
     - configMap:
         name: mcrouter
       name: mcrouter
     - name: config
       emptyDir: {}
Since mcrouter uses hostNetwork, we also restrict it to listening to the internal IP addresses of nodes.
Below is the configuration file for building a mcrouter image using werf (you can easily convert it to a regular Dockerfile):
image: mcrouter
from: ubuntu:18.04
mount:
- from: tmp_dir
 to: /var/lib/apt/lists
ansible:
beforeInstall:
- name: Install prerequisites
  apt:
    name:
    - apt-transport-https
    - apt-utils
    - dnsutils
    - gnupg
    - tzdata
    - locales
    update_cache: yes
- name: Add mcrouter APT key
  apt_key:
    url: https://facebook.github.io/mcrouter/debrepo/bionic/PUBLIC.KEY
- name: Add mcrouter Repo
  apt_repository:
    repo: deb https://facebook.github.io/mcrouter/debrepo/bionic bionic contrib
    filename: mcrouter
    update_cache: yes
- name: Set timezone
  timezone:
    name: "Europe/London"
- name: Ensure a locale exists
  locale_gen:
    name: en_US.UTF-8
    state: present
install:
- name: Install mcrouter
  apt:
    name:
    - mcrouter
Now let’s move on to the most exciting part, the mcrouter config. We have to generate it on the fly after a Pod is scheduled on a particular node to set that node’s address as the primary one. To do so, you need to run an init container in the mcrouter Pod. It will generate the configuration file and save it to the shared emptyDir volume:
     initContainers:
     - name: init
       image: {{ .Values.werf.image.mcrouter }}
       command:
       - /bin/bash
       - -c
       - /mnt/config/config_generator.sh /mnt/config/config.json
       volumeMounts:
       - name: mcrouter
         mountPath: /mnt/config/config_generator.sh
         subPath: config_generator.sh
       - name: config
         mountPath: /mnt/config
       env:
       - name: HOST_IP
         valueFrom:
           fieldRef:
             fieldPath: status.hostIP
Here is the example of a config generator script that runs in the init container:
apiVersion: v1
kind: ConfigMap
metadata:
 name: mcrouter
data:
 config_generator.sh: |
   #!/bin/bash
   set -e
   set -o pipefail

   config_path=$1;
   if [ -z "${config_path}" ]; then echo "config_path isn't specified"; exit 1; fi

   function join_by { local d=$1; shift; local f=$1; shift; printf %s "$f" "${@/#/$d}"; }

   mapfile -t ips < <( host mc.production.svc.cluster.local 10.222.0.10 | grep mc.production.svc.cluster.local | awk '{ print $4; }' | sort | grep -v $HOST_IP )

   delimiter=':30213","'

   servers='"'$(join_by $delimiter $HOST_IP "${ips[@]}")':30213"'

   cat <<< '{
     "pools": {
       "A": {
         "servers": [
           '$servers'
         ]
       }
     },
     "route": {
       "type": "OperationSelectorRoute",
       "operation_policies": {
         "add": "AllSyncRoute|Pool|A",
         "delete": "AllSyncRoute|Pool|A",
         "get": "FailoverRoute|Pool|A",
         "set": "AllSyncRoute|Pool|A"
       }
     }
   }
   ' > $config_path
The script sends requests to the cluster’s internal DNS, gets all the IP addresses for memcached Pods, and generates their list. The first in the list is the node’s IP address where this specific mcrouter instance is running.
Note that you have to set clusterIP: None in the memcached Service manifest above to get the Pod addresses when requesting DNS records.
Below is an example of a file generated by the script:
cat /mnt/config/config.json
{
  "pools": {
    "A": {
      "servers": [
"192.168.100.33:30213","192.168.100.14:30213","192.168.100.15:30213","192.168.100.16:30213","192.168.100.21:30213","192.168.100.22:30213","192.168.100.23:30213","192.168.100.34:30213"
      ]
    }
  },
  "route": {
    "type": "OperationSelectorRoute",
    "operation_policies": {
      "add": "AllSyncRoute|Pool|A",
      "delete": "AllSyncRoute|Pool|A",
      "get": "FailoverRoute|Pool|A",
      "set": "AllSyncRoute|Pool|A"
    }
  }
}
This way, we ensure that changes are synchronously propagated to all memcached instances while reads are going on on the “local” node.
NB. In the event that there is no strict cache coherence requirement, we recommend using AllMajorityRoute or even AllFastestRoute route handle instead of AllSyncRoute for faster performance and less general sensitivity to cluster instability.
Adjusting to the ever-changing nature of the cluster
However, there does exist one nuisance: clusters are not static and the number of working nodes in a cluster can change. The cache coherence cannot be maintained if the number of cluster nodes increases since:
- there will be new memcached/mcrouter instances;
- new mcrouter instances will write into the old memcached instances; meanwhile, the old mcrouter instances will have no idea that there are new memcached instances available.
At the same time, if the number of nodes decreases (provided that the AllSyncRoute policy is enabled), the node cache will essentially become read-only.
The possible workaround is to run a sidecar container with cron in the mcrouter Pod that will verify the list of nodes and apply the changes.
Below is the configuration of such a sidecar:
     - name: cron
       image: {{ .Values.werf.image.cron }}
       command:
       - /usr/local/bin/dumb-init
       - /bin/sh
       - -c
       - /usr/local/bin/supercronic -json /app/crontab
       volumeMounts:
       - name: mcrouter
         mountPath: /mnt/config/config_generator.sh
         subPath: config_generator.sh
       - name: mcrouter
         mountPath: /mnt/config/check_nodes.sh
         subPath: check_nodes.sh
       - name: mcrouter
         mountPath: /app/crontab
         subPath: crontab
       - name: config
         mountPath: /mnt/config
       resources:
         limits:
           memory: 64Mi
         requests:
           memory: 64Mi
           cpu: 5m
       env:
       - name: HOST_IP
         valueFrom:
           fieldRef:
             fieldPath: status.hostIP
The scripts running in this cron container invoke the same config_generator.sh script used in the init container:
 crontab: |
   # Check nodes in cluster
   * * * * * * *   /mnt/config/check_nodes.sh /mnt/config/config.json

 check_nodes.sh: |
   #!/usr/bin/env bash
   set -e

   config_path=$1;
   if [ -z "${config_path}" ]; then echo "config_path isn't specified"; exit 1; fi

   check_path="${config_path}.check"

   checksum1=$(md5sum $config_path | awk '{print $1;}')

   /mnt/config/config_generator.sh $check_path

   checksum2=$(md5sum $check_path | awk '{print $1;}')

   if [[ $checksum1 == $checksum2 ]]; then
       echo "No changes for nodes."
       exit 0;
   else
       echo "Node list was changed."
       mv $check_path $config_path
       echo "mcrouter is reconfigured."
   fi
Once a second, a script is run that generates a configuration file for the mcrouter. When the checksum of the configuration file changes, the updated file is saved to the emptyDir shared directory so mcrouter can use it. You do not have to worry about mcrouter updating the configuration because it re-reads its parameters once per second anyway.
Now all you have to do is to pass the IP address of the Node to the application Pod via the environment variable containing the memcached address while specifying the mcrouter port instead of the memcached one:
       env:
       - name: MEMCACHED_HOST
         valueFrom:
           fieldRef:
             fieldPath: status.hostIP
       - name: MEMCACHED_PORT
         value: 31213
Summing it all up
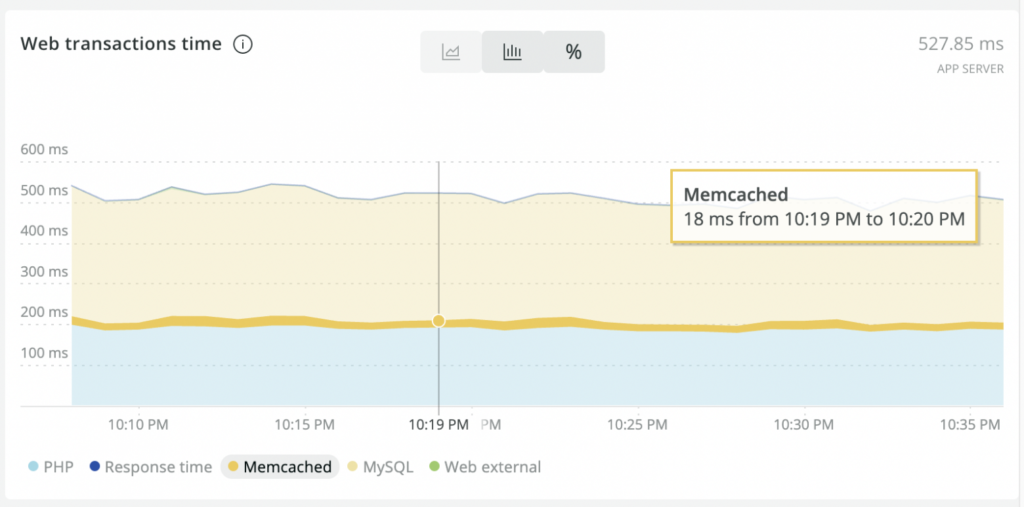
The ultimate goal has been achieved: the application now runs much faster. New Relic data show that the memcached transaction times in processing user requests have dropped from 70-80 ms to ~20 ms.
Before optimization:
This solution has been in production for about six months; no pitfalls have been discovered over that time.


Comments